
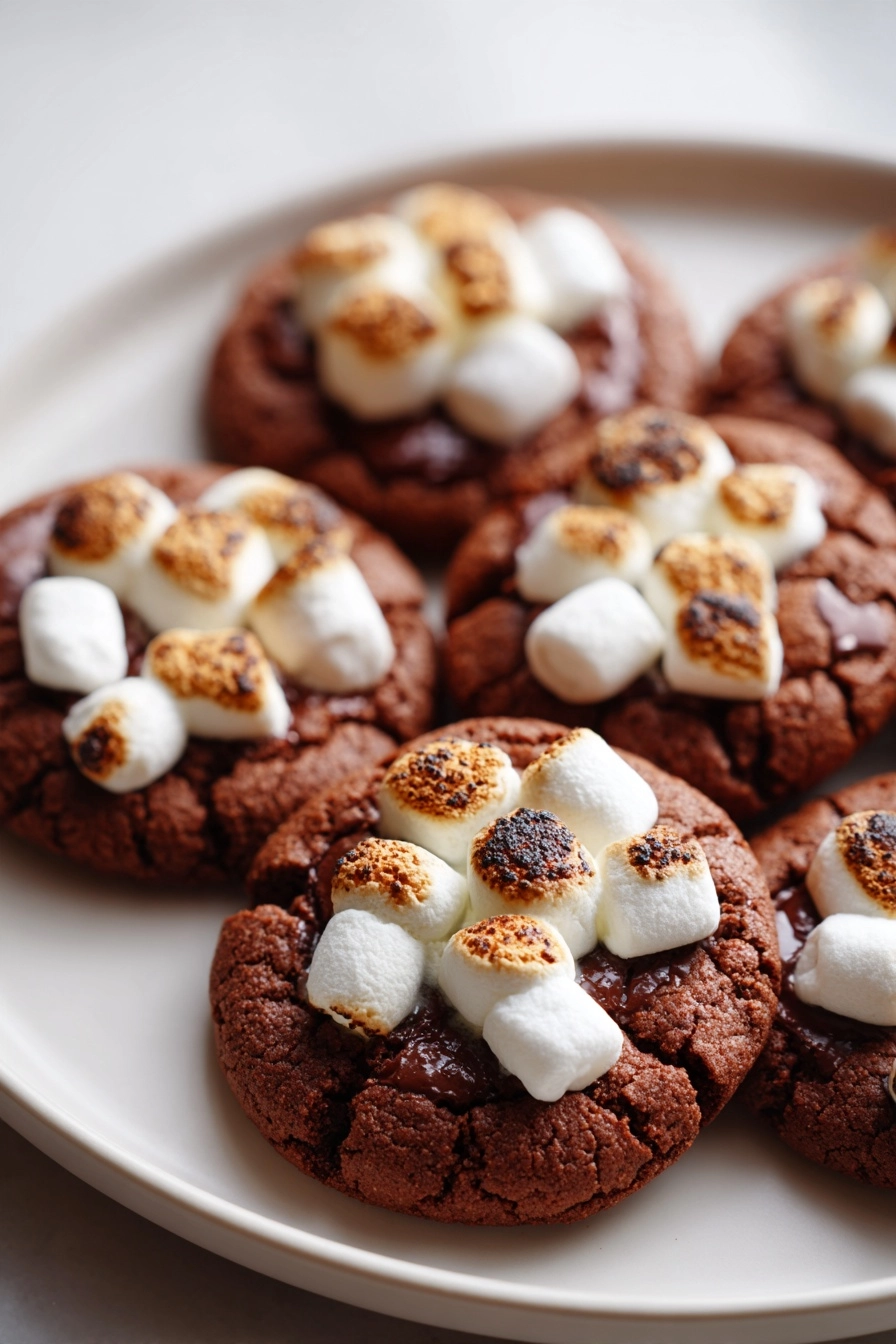
Gluten-Free Hot Chocolate Cookies
As a busy mom, I know how precious time can be, especially when it comes to baking. That’s why these Gluten-Free Hot Chocolate Cookies are a delightful treat that fits perfectly into our hectic lives. Imagine the rich, cozy flavors of hot chocolate wrapped in a chewy cookie—it’s like a warm hug on a plate! Whether you’re looking to impress your loved ones or simply need a quick solution for a sweet craving, these cookies are just the ticket. Trust me, once you take a bite, you’ll be hooked!
Why You’ll Love This Gluten-Free Hot Chocolate Cookies
These Gluten-Free Hot Chocolate Cookies are not just easy to make; they’re a joy to eat! With a prep time of only 15 minutes, you can whip up a batch even on the busiest days. The rich chocolate flavor will satisfy your sweet tooth, while the chewy texture makes them utterly irresistible. Plus, they’re gluten-free, so everyone can enjoy them without worry. What’s not to love?
Ingredients for Gluten-Free Hot Chocolate Cookies
Gathering the right ingredients is the first step to creating these delightful Gluten-Free Hot Chocolate Cookies. Here’s what you’ll need:
- Gluten-free all-purpose flour: This is the base of your cookies, providing structure without the gluten. Look for a blend that includes xanthan gum for the best results.
- Unsweetened cocoa powder: This adds that rich chocolate flavor we all crave. Choose a high-quality cocoa for a deeper taste.
- Granulated sugar: This sweetens the cookies and helps achieve that perfect chewy texture.
- Brown sugar: It adds moisture and a hint of caramel flavor, making your cookies even more delicious.
- Unsalted butter: Softened butter is key for creaming with the sugars, creating a light and fluffy dough.
- Large eggs: Eggs bind the ingredients together and contribute to the cookies’ structure and richness.
- Vanilla extract: A splash of vanilla enhances the overall flavor, making each bite more delightful.
- Baking powder: This leavening agent helps the cookies rise slightly, giving them a nice texture.
- Salt: Just a pinch balances the sweetness and enhances the chocolate flavor.
- Chocolate chips: The star of the show! You can use semi-sweet, dark, or even white chocolate chips for a fun twist.
For those who want to experiment, consider adding nuts or a sprinkle of sea salt on top before baking. If you’re looking for a dairy-free option, swap the butter for coconut oil and use dairy-free chocolate chips. The exact quantities for each ingredient are listed at the bottom of the article, ready for printing!
How to Make Gluten-Free Hot Chocolate Cookies
Now that you have your ingredients ready, let’s dive into the fun part—making these Gluten-Free Hot Chocolate Cookies! Follow these simple steps, and you’ll have a batch of delicious cookies in no time.
Step 1: Preheat the Oven
First things first, preheat your oven to 350°F (175°C). Preheating is crucial because it ensures that your cookies bake evenly. If the oven isn’t hot enough, your cookies might spread too much or not rise properly. Trust me, a well-preheated oven is the secret to cookie perfection!
Step 2: Cream the Butter and Sugars
In a large bowl, cream together the softened butter, granulated sugar, and brown sugar until smooth. This process is essential for creating a light and fluffy texture. The sugar crystals help to aerate the butter, which gives your cookies that delightful chewiness. Don’t rush this step; take your time to mix until it’s creamy and well combined.
Step 3: Add Eggs and Vanilla
Next, add the eggs and vanilla extract to the butter mixture. Mix until everything is well combined. The eggs act as a binder, holding the ingredients together, while the vanilla adds a warm, inviting flavor. It’s like a cozy hug for your taste buds!
Step 4: Combine Dry Ingredients
In a separate bowl, whisk together the gluten-free flour, cocoa powder, baking powder, and salt. Mixing the dry ingredients separately is important in gluten-free baking. It helps to evenly distribute the leavening agents and ensures that your cookies rise beautifully. Plus, it prevents any clumps of cocoa powder from ruining your cookie dough.
Step 5: Mix Wet and Dry Ingredients
Now, gradually add the dry ingredients to the wet mixture. Stir gently until just combined. Be careful not to overmix! Overmixing can lead to tough cookies, and we want them to be soft and chewy. A few flour streaks are okay; they’ll disappear as you fold in the chocolate chips.
Step 6: Fold in Chocolate Chips
Speaking of chocolate chips, it’s time to fold them into your dough! You can use semi-sweet, dark, or even white chocolate chips for a fun twist. Each type brings its own unique flavor, so feel free to mix and match. Just be gentle as you fold them in to keep that lovely texture intact.
Step 7: Scoop and Bake
Using a spoon or cookie scoop, drop spoonfuls of dough onto a baking sheet lined with parchment paper. Make sure to leave some space between each cookie, as they will spread while baking. Bake for 10-12 minutes, or until the edges are set. Keep an eye on them; you want them to be soft in the center but firm around the edges.
Step 8: Cool and Enjoy
Once baked, allow the cookies to cool on the baking sheet for a few minutes before transferring them to a wire rack. This cooling time is essential for achieving the perfect texture. If you move them too soon, they might fall apart. Let them cool completely, then enjoy the fruits of your labor!
Tips for Success
- Use room temperature ingredients for better mixing.
- Don’t skip the cooling time; it helps the cookies firm up.
- For extra flavor, try adding a pinch of cinnamon or espresso powder.
- Keep an eye on baking time; ovens can vary.
- Store cookies in an airtight container to maintain freshness.
Equipment Needed
- Mixing bowls: A large bowl for wet ingredients and a medium bowl for dry ingredients.
- Electric mixer: A hand mixer works great, but a whisk can do the job too.
- Baking sheet: Use a standard baking sheet or a silicone baking mat for easy cleanup.
- Parchment paper: This helps prevent sticking and makes for easy cookie removal.
- Cookie scoop: A spoon works, but a cookie scoop ensures even-sized cookies.
Variations
- Nutty Delight: Add chopped walnuts or pecans for a crunchy texture and nutty flavor.
- Minty Fresh: Incorporate peppermint extract or crushed peppermint candies for a festive twist.
- Spicy Kick: Mix in a pinch of cayenne pepper or chili powder for a surprising heat that complements the chocolate.
- Fruit Fusion: Toss in dried cherries or cranberries for a fruity contrast to the rich chocolate.
- Vegan Option: Substitute the butter with coconut oil and use flax eggs instead of regular eggs for a plant-based version.
Serving Suggestions
- Pair these cookies with a warm cup of milk or your favorite dairy-free alternative for a cozy treat.
- Serve alongside a scoop of vanilla ice cream for an indulgent dessert experience.
- For a festive touch, dust with powdered sugar before serving.
- Present them on a colorful platter for a delightful display at gatherings.
FAQs about Gluten-Free Hot Chocolate Cookies
Can I use regular flour instead of gluten-free flour?
While I love the texture of these Gluten-Free Hot Chocolate Cookies, using regular flour will change the outcome. The recipe is specifically designed for gluten-free flour, which helps achieve that chewy texture without gluten.
How do I store leftover cookies?
To keep your cookies fresh, store them in an airtight container at room temperature. They’ll stay delicious for up to a week. If you want to keep them longer, you can freeze them for up to three months!
Can I make these cookies dairy-free?
Absolutely! Just swap the unsalted butter for coconut oil and use dairy-free chocolate chips. You’ll still get that rich chocolate flavor without the dairy.
What can I add to enhance the flavor?
For a little extra flair, consider adding a pinch of cinnamon or espresso powder. Both will elevate the chocolate flavor and add a delightful twist to your cookies!
How do I know when the cookies are done baking?
Keep an eye on the edges of the cookies. They should be set while the centers remain soft. If the edges are firm and slightly crisp, it’s time to take them out. They’ll continue to firm up as they cool!
Summarizing the Joy of Gluten-Free Hot Chocolate Cookies
There’s something truly magical about baking a batch of Gluten-Free Hot Chocolate Cookies. The aroma fills your kitchen, wrapping you in warmth and comfort. Each bite is a delightful blend of rich chocolate and chewy goodness, perfect for sharing with family or savoring alone. These cookies not only satisfy your sweet cravings but also bring a sense of joy and nostalgia. Whether it’s a cozy evening at home or a festive gathering, these cookies are sure to create sweet memories. So, roll up your sleeves and indulge in the happiness that comes from baking and sharing these treats!
PrintGluten-Free Hot Chocolate Cookies Are Irresistibly Delicious!
These Gluten-Free Hot Chocolate Cookies are a delightful treat, combining the rich flavors of hot chocolate with a chewy cookie texture.
- Prep Time: 15 minutes
- Cook Time: 12 minutes
- Total Time: 27 minutes
- Yield: 24 cookies 1x
- Category: Dessert
- Method: Baking
- Cuisine: American
- Diet: Gluten Free
Ingredients
- 1 cup gluten-free all-purpose flour
- 1/2 cup unsweetened cocoa powder
- 1/2 cup granulated sugar
- 1/2 cup brown sugar
- 1/2 cup unsalted butter, softened
- 2 large eggs
- 1 teaspoon vanilla extract
- 1/2 teaspoon baking powder
- 1/4 teaspoon salt
- 1 cup chocolate chips
Instructions
- Preheat your oven to 350°F (175°C).
- In a large bowl, cream together the softened butter, granulated sugar, and brown sugar until smooth.
- Add the eggs and vanilla extract, mixing until well combined.
- In a separate bowl, whisk together the gluten-free flour, cocoa powder, baking powder, and salt.
- Gradually add the dry ingredients to the wet ingredients, mixing until just combined.
- Fold in the chocolate chips.
- Drop spoonfuls of dough onto a baking sheet lined with parchment paper.
- Bake for 10-12 minutes, or until the edges are set.
- Allow to cool on the baking sheet for a few minutes before transferring to a wire rack to cool completely.
Notes
- For a richer flavor, use dark chocolate chips.
- Store cookies in an airtight container for up to a week.
- These cookies can be frozen for up to three months.
Nutrition
- Serving Size: 1 cookie
- Calories: 150
- Sugar: 10g
- Sodium: 50mg
- Fat: 7g
- Saturated Fat: 4g
- Unsaturated Fat: 2g
- Trans Fat: 0g
- Carbohydrates: 20g
- Fiber: 1g
- Protein: 2g
- Cholesterol: 20mg