
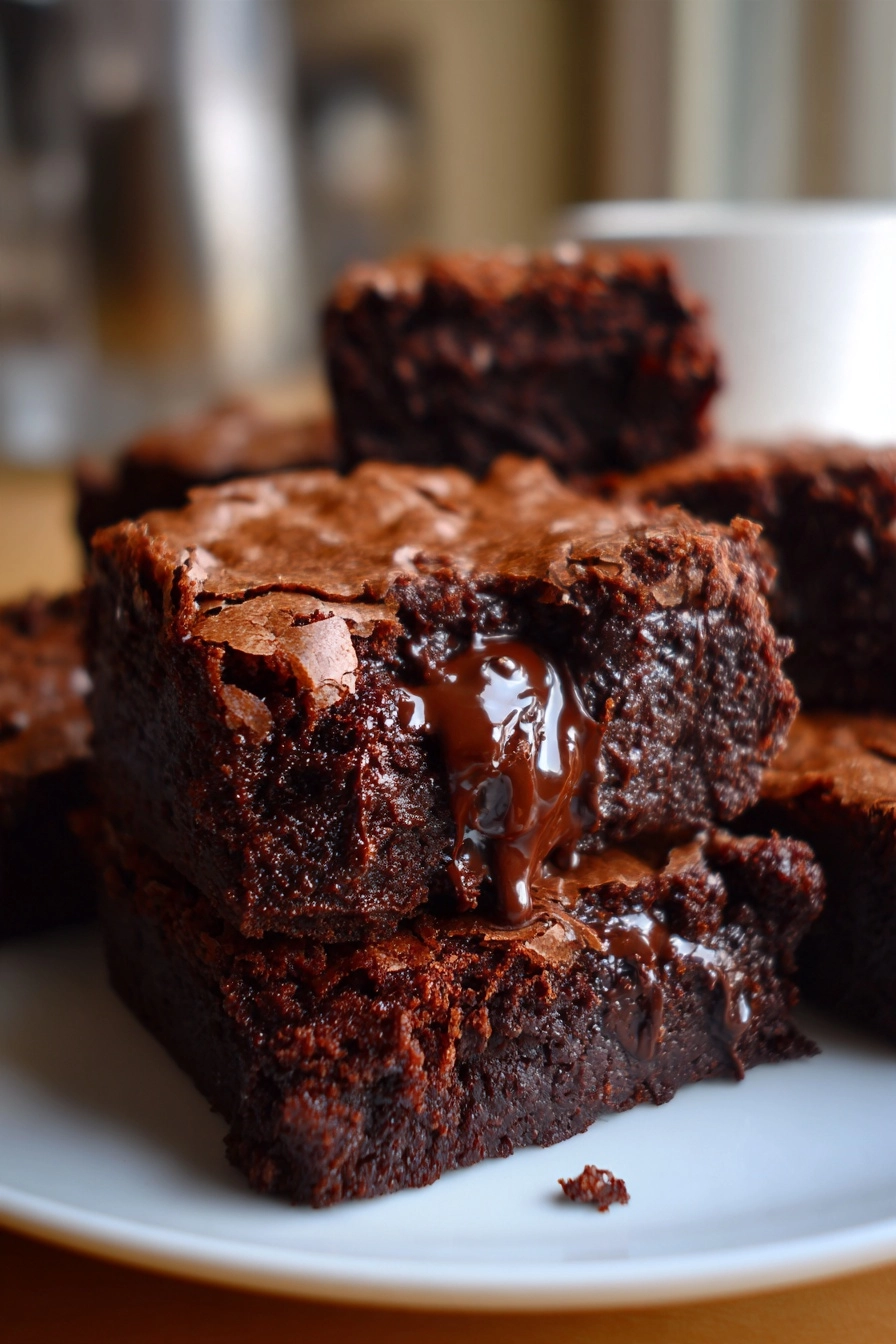
Gluten-Free Hot Chocolate Brownies
As a busy mom, I know how precious time can be, especially when it comes to whipping up something delicious. That’s why I’m excited to share my recipe for Gluten-Free Hot Chocolate Brownies! These brownies are not just a treat; they’re a warm hug in dessert form. Rich, fudgy, and oh-so-chocolatey, they’re perfect for satisfying those sweet cravings after a long day. Whether you’re looking to impress your loved ones or simply indulge yourself, these brownies are a quick solution that will leave everyone asking for seconds. Trust me, they melt in your mouth!
Why You’ll Love This Gluten-Free Hot Chocolate Brownies
These Gluten-Free Hot Chocolate Brownies are a dream come true for busy lives. They come together in just 15 minutes, making them a perfect last-minute dessert. The rich, fudgy texture is simply irresistible, and they’re sure to please even the pickiest eaters. Plus, you can whip them up with pantry staples, so you won’t need a special trip to the store. Who doesn’t love a quick, delicious treat?
Ingredients for Gluten-Free Hot Chocolate Brownies
Gathering the right ingredients is the first step to creating these delightful Gluten-Free Hot Chocolate Brownies. Here’s what you’ll need:
- Gluten-free all-purpose flour: This is the base of our brownies, providing structure without the gluten. Look for a blend that includes xanthan gum for the best results.
- Unsweetened cocoa powder: This adds that rich chocolate flavor. For a deeper taste, consider using dark chocolate cocoa powder.
- Granulated sugar: This sweetens the brownies and helps create that lovely fudgy texture.
- Brown sugar: It adds moisture and a hint of caramel flavor, making the brownies even more decadent.
- Unsalted butter: Melted butter gives the brownies a rich, buttery flavor. You can substitute with coconut oil for a dairy-free option.
- Large eggs: Eggs bind the ingredients together and contribute to the fudgy texture. If you need an egg substitute, try using flax eggs.
- Vanilla extract: A splash of vanilla enhances the overall flavor, making the brownies taste even more delightful.
- Salt: Just a pinch balances the sweetness and enhances the chocolate flavor.
- Chocolate chips (optional): For those who can’t resist extra chocolate, fold in some chocolate chips for an added layer of richness.
For exact measurements, check the bottom of the article where you can find everything listed for easy printing. Happy baking!
How to Make Gluten-Free Hot Chocolate Brownies
Step 1: Preheat the Oven
First things first, preheat your oven to 350°F (175°C). This step is crucial for even baking. While the oven warms up, grease a 9×9 inch baking pan. A well-prepared pan ensures your brownies won’t stick, making it easier to cut them into perfect squares later.
Step 2: Mix Wet Ingredients
In a large bowl, combine the melted butter, granulated sugar, and brown sugar. Mix them until they’re well blended and creamy. Next, add the eggs and vanilla extract. Stir until the mixture is smooth and glossy. This is where the magic begins, as the sugars and butter create a luscious base for your brownies!
Step 3: Combine Dry Ingredients
In another bowl, whisk together the gluten-free all-purpose flour, cocoa powder, and salt. This step is essential to ensure that the dry ingredients are evenly distributed. It helps prevent clumps and guarantees a consistent texture throughout your Gluten-Free Hot Chocolate Brownies.
Step 4: Combine Wet and Dry Mixtures
Now, it’s time to bring the two mixtures together. Gradually add the dry ingredients to the wet ingredients. Mix gently until just combined. Be careful not to overmix, as this can lead to dense brownies. You want them to be fudgy and melt-in-your-mouth delicious!
Step 5: Add Chocolate Chips
If you’re a chocolate lover like me, this step is a must! Fold in the chocolate chips for an extra layer of richness. They’ll melt slightly during baking, creating gooey pockets of chocolate that will make your brownies even more irresistible. Trust me, you won’t regret it!
Step 6: Bake the Brownies
Pour the brownie batter into your prepared baking pan and spread it evenly. Bake for 25-30 minutes. To check for doneness, insert a toothpick into the center. It should come out with a few moist crumbs, indicating that your brownies are perfectly fudgy!
Step 7: Cool and Serve
Once baked, remove the brownies from the oven and let them cool in the pan for about 10 minutes. Then, transfer them to a wire rack to cool completely. When they’re cool, cut them into squares. Serve them warm or at room temperature for a delightful treat!
Tips for Success
- Use room temperature eggs for better mixing and texture.
- Don’t overmix the batter; it should be just combined for fudgy brownies.
- For a cleaner cut, use a plastic knife to slice the brownies.
- Let the brownies cool completely before cutting to avoid crumbling.
- Experiment with different mix-ins like nuts or dried fruit for variety!
Equipment Needed
- 9×9 inch baking pan: A square pan is ideal, but you can use an 8×8 inch pan if that’s what you have.
- Mixing bowls: Use any size, but a large bowl is best for mixing wet ingredients.
- Whisk: A whisk helps combine dry ingredients, but a fork works too!
- Spatula: A rubber spatula is perfect for folding in chocolate chips and scraping the bowl clean.
- Toothpick: Essential for checking the doneness of your brownies.
Variations
- Nutty Delight: Add chopped walnuts or pecans for a crunchy texture that complements the fudgy brownies.
- Minty Fresh: Incorporate peppermint extract or crushed peppermint candies for a festive twist, perfect for the holidays!
- Spicy Kick: Mix in a pinch of cayenne pepper or chili powder for a surprising heat that pairs beautifully with chocolate.
- Fruit Fusion: Fold in dried cherries or raspberries for a fruity burst that balances the richness of the brownies.
- Vegan Option: Substitute eggs with flax eggs and use coconut oil instead of butter for a delicious vegan treat.
Serving Suggestions
- Pair your Gluten-Free Hot Chocolate Brownies with a scoop of vanilla ice cream for a delightful contrast.
- Serve with a dollop of whipped cream and a sprinkle of cocoa powder for an elegant touch.
- Enjoy with a warm cup of coffee or hot chocolate for the ultimate cozy experience.
- For a festive presentation, dust with powdered sugar and add fresh berries on the side.
FAQs about Gluten-Free Hot Chocolate Brownies
Can I use regular flour instead of gluten-free flour?
While I love the texture of these Gluten-Free Hot Chocolate Brownies, using regular flour will change the outcome. Stick to gluten-free flour for the best results!
How do I store leftover brownies?
Store your brownies in an airtight container at room temperature for up to three days. If you want to keep them longer, freeze them for up to two months. Just make sure to wrap them well!
Can I make these brownies dairy-free?
Absolutely! Substitute the unsalted butter with coconut oil or a dairy-free butter alternative. Your brownies will still be rich and fudgy!
What can I use instead of eggs?
If you need an egg substitute, try using flax eggs. Mix one tablespoon of ground flaxseed with three tablespoons of water and let it sit for a few minutes until it thickens. It works like a charm!
How can I make these brownies more chocolatey?
For an extra chocolatey kick, use dark chocolate cocoa powder and fold in chocolate chips. You can never have too much chocolate, right?
Summarizing the Joy of Gluten-Free Hot Chocolate Brownies
There’s something truly magical about baking a batch of Gluten-Free Hot Chocolate Brownies. The aroma fills your kitchen, wrapping you in warmth and comfort. Each bite is a delightful experience, with rich chocolate melting in your mouth, making it hard to resist going back for more. These brownies are not just a dessert; they’re a way to create sweet memories with family and friends. Whether you’re celebrating a special occasion or simply treating yourself after a long day, these brownies bring joy and satisfaction that’s hard to beat. Enjoy every fudgy moment!
PrintGluten-Free Hot Chocolate Brownies That Melt in Your Mouth!
Deliciously rich and fudgy gluten-free hot chocolate brownies that melt in your mouth, perfect for chocolate lovers.
- Prep Time: 15 minutes
- Cook Time: 30 minutes
- Total Time: 45 minutes
- Yield: 16 brownies 1x
- Category: Dessert
- Method: Baking
- Cuisine: American
- Diet: Gluten Free
Ingredients
- 1 cup gluten-free all-purpose flour
- 1/2 cup unsweetened cocoa powder
- 1 cup granulated sugar
- 1/2 cup brown sugar
- 1/2 cup unsalted butter, melted
- 2 large eggs
- 1 teaspoon vanilla extract
- 1/4 teaspoon salt
- 1/2 cup chocolate chips (optional)
Instructions
- Preheat your oven to 350°F (175°C) and grease a 9×9 inch baking pan.
- In a large bowl, mix together the melted butter, granulated sugar, and brown sugar until well combined.
- Add the eggs and vanilla extract, and mix until smooth.
- In another bowl, whisk together the gluten-free flour, cocoa powder, and salt.
- Gradually add the dry ingredients to the wet ingredients, mixing until just combined.
- If using, fold in the chocolate chips.
- Pour the batter into the prepared baking pan and spread evenly.
- Bake for 25-30 minutes, or until a toothpick inserted in the center comes out with a few moist crumbs.
- Let cool before cutting into squares and serving.
Notes
- For a richer flavor, use dark chocolate cocoa powder.
- Store leftovers in an airtight container for up to 3 days.
- These brownies can be frozen for up to 2 months.
Nutrition
- Serving Size: 1 brownie
- Calories: 200
- Sugar: 18g
- Sodium: 150mg
- Fat: 10g
- Saturated Fat: 6g
- Unsaturated Fat: 4g
- Trans Fat: 0g
- Carbohydrates: 25g
- Fiber: 2g
- Protein: 3g
- Cholesterol: 40mg