
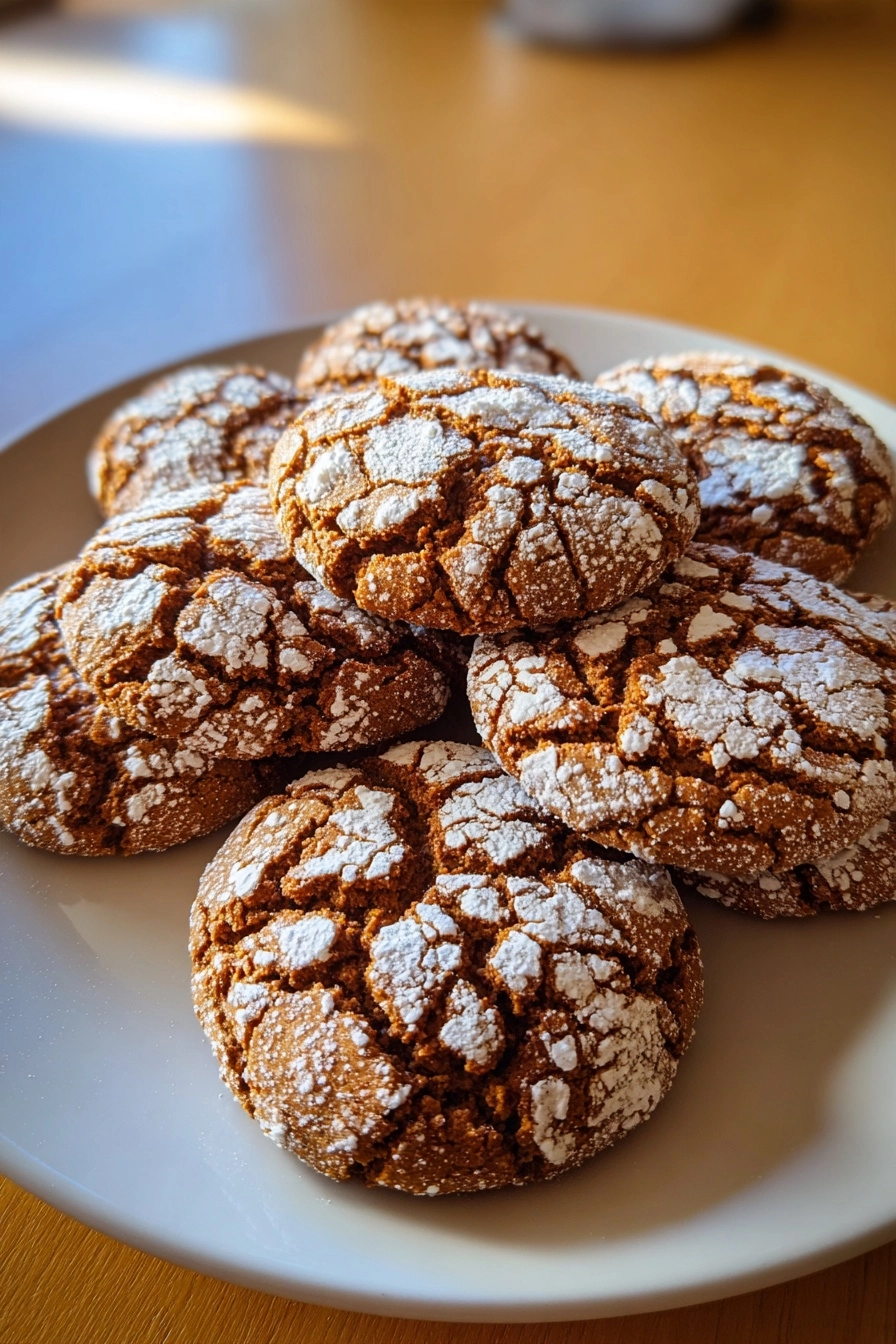
Gluten-Free Gingerbread Crinkle Cookies
As the holiday season approaches, I find myself craving the warm, spicy aroma of freshly baked cookies. These Gluten-Free Gingerbread Crinkle Cookies are my go-to treat, perfect for busy days when I want to whip up something festive without a fuss. They’re not just easy to make; they also bring a smile to everyone’s face, especially when they see those delightful crinkles dusted in powdered sugar. Whether you’re hosting a gathering or simply treating your family, these cookies are sure to impress and spread holiday cheer!
Why You’ll Love This Gluten-Free Gingerbread Crinkle Cookies
These Gluten-Free Gingerbread Crinkle Cookies are a delightful blend of ease and flavor. They come together quickly, making them perfect for busy moms like me who juggle a million things. The rich spices and soft texture create a cozy treat that warms the heart. Plus, the crinkly tops dusted with powdered sugar are simply irresistible, making them a hit at any holiday gathering!
Ingredients for Gluten-Free Gingerbread Crinkle Cookies
Gathering the right ingredients is the first step to creating these delightful Gluten-Free Gingerbread Crinkle Cookies. Here’s what you’ll need:
- Gluten-free all-purpose flour: This is the base of our cookies, providing structure without the gluten. Look for a blend that includes xanthan gum for the best results.
- Brown sugar: It adds a rich, caramel-like sweetness and moisture, making the cookies soft and chewy.
- Molasses: This ingredient brings that classic gingerbread flavor and a deep color. It’s what makes these cookies taste like the holidays!
- Unsalted butter: Softened butter is essential for creaming with sugar, creating a light texture. Unsalted allows you to control the saltiness.
- Large egg: The egg acts as a binder, helping the cookies hold their shape while adding richness.
- Baking soda: This leavening agent helps the cookies rise and gives them that lovely crinkle effect.
- Ground ginger: A key spice in gingerbread, it adds warmth and a bit of zing to each bite.
- Ground cinnamon: This spice complements the ginger, creating a cozy, aromatic flavor profile.
- Ground cloves: Just a pinch adds depth and a hint of earthiness, enhancing the overall flavor.
- Salt: A small amount balances the sweetness and enhances the flavors of the spices.
- Powdered sugar: This is for rolling the cookie dough balls, giving them that signature snowy appearance.
For those looking to customize, you can swap the brown sugar for coconut sugar for a lower glycemic option. If you’re out of molasses, honey or maple syrup can work in a pinch, though the flavor will differ slightly. Remember, the exact measurements are at the bottom of the article and available for printing!
How to Make Gluten-Free Gingerbread Crinkle Cookies
Step 1: Preheat the Oven
Start by preheating your oven to 350°F (175°C). This step is crucial for even baking. While the oven heats, line a baking sheet with parchment paper. This prevents sticking and makes cleanup a breeze. Trust me, your future self will thank you!
Step 2: Cream the Butter and Sugar
In a large bowl, cream together the softened butter and brown sugar until it’s light and fluffy. This process incorporates air, giving your cookies a tender texture. It’s like giving your cookies a little spa treatment before they hit the oven!
Step 3: Mix in Molasses and Egg
Add the molasses and egg to the creamed mixture. The molasses brings that signature gingerbread flavor, while the egg binds everything together. This combination creates a rich, flavorful base that will make your cookies irresistible!
Step 4: Combine Dry Ingredients
In another bowl, whisk together the gluten-free flour, baking soda, ginger, cinnamon, cloves, and salt. Whisking ensures even distribution of the spices and leavening agent. This step is key to achieving that perfect crinkle and flavor in your cookies!
Step 5: Form the Dough
Gradually add the dry ingredients to the wet mixture, mixing until a dough forms. Once combined, chill the dough in the refrigerator for at least 30 minutes. Chilling helps the flavors meld and prevents the cookies from spreading too much while baking.
Step 6: Shape and Roll the Cookies
After chilling, scoop out tablespoon-sized portions of dough and roll them into balls. Then, roll each ball in powdered sugar until well coated. This gives your cookies that beautiful snowy appearance and adds a touch of sweetness!
Step 7: Bake the Cookies
Place the cookie balls on the prepared baking sheet, spacing them about 2 inches apart. Bake for 10-12 minutes, or until the edges are set and the tops are crinkled. Keep an eye on them; you want that perfect balance of chewy and crinkly!
Step 8: Cool and Enjoy
Once baked, allow the cookies to cool on the baking sheet for a few minutes before transferring them to a wire rack. This cooling time helps them firm up. Store any leftovers in an airtight container for up to a week, if they last that long!
Tips for Success
- Use room temperature ingredients for better mixing and texture.
- Don’t skip the chilling step; it’s essential for the right cookie shape.
- For extra flavor, consider adding a pinch of nutmeg or allspice.
- Keep an eye on baking time; every oven is different!
- Experiment with different coatings, like crushed nuts or sprinkles, for a fun twist.
Equipment Needed
- Baking sheet: A standard baking sheet works well, but a silicone mat can prevent sticking.
- Parchment paper: This is great for easy cleanup; aluminum foil can be a substitute.
- Mixing bowls: Use any size, but a large bowl is ideal for creaming ingredients.
- Whisk: A whisk is perfect for combining dry ingredients; a fork can work in a pinch.
- Spoon or cookie scoop: A cookie scoop ensures uniform sizes; a tablespoon works too!
Variations
- Chocolate Chip Addition: Fold in gluten-free chocolate chips for a delightful twist on the classic flavor.
- Nutty Crunch: Add chopped walnuts or pecans for a crunchy texture that complements the soft cookies.
- Spicy Kick: Increase the ground ginger and cinnamon for a spicier version that packs a flavorful punch.
- Vegan Option: Substitute the egg with a flaxseed meal or applesauce and use coconut oil instead of butter.
- Gluten-Free Flour Blend: Experiment with different gluten-free flour blends, like almond or coconut flour, for unique flavors and textures.
Serving Suggestions
- Pair these Gluten-Free Gingerbread Crinkle Cookies with a warm cup of spiced chai or hot cocoa for a cozy treat.
- Serve them on a festive platter, garnished with fresh cranberries or sprigs of rosemary for a holiday touch.
- For a fun twist, sandwich two cookies with a scoop of vanilla ice cream for a delightful dessert.
FAQs about Gluten-Free Gingerbread Crinkle Cookies
Can I use regular flour instead of gluten-free flour?
While I love the texture of these Gluten-Free Gingerbread Crinkle Cookies with gluten-free flour, you can use regular all-purpose flour if gluten isn’t a concern. Just remember, the texture and flavor may differ slightly!
How do I store these cookies?
Store your cookies in an airtight container at room temperature for up to a week. If you want to keep them longer, freeze them for up to three months. Just make sure to separate layers with parchment paper to prevent sticking!
Can I make these cookies ahead of time?
Absolutely! You can prepare the dough in advance and chill it in the fridge for up to 24 hours. Just roll and bake when you’re ready for fresh cookies!
What can I substitute for molasses?
If you’re out of molasses, honey or maple syrup can work as substitutes. Keep in mind that the flavor will change slightly, but they’ll still be delicious!
Why are my cookies not crinkling?
If your cookies aren’t crinkling, it might be due to not chilling the dough long enough or not using enough baking soda. Make sure to follow the steps closely for that perfect crinkle!
Summarizing the Joy of Baking Gluten-Free Gingerbread Crinkle Cookies
Baking these Gluten-Free Gingerbread Crinkle Cookies is more than just a culinary task; it’s a heartwarming experience that fills your home with the spirit of the season. The delightful aroma wafting through the kitchen brings back cherished memories and creates new ones with loved ones. Each crinkly cookie, dusted in powdered sugar, is a little piece of joy that invites smiles and laughter. Whether enjoyed with family or shared with friends, these cookies embody the warmth of the holidays, making every bite a celebration of love, togetherness, and the simple pleasures of life.
PrintGluten-Free Gingerbread Crinkle Cookies: A Festive Delight!
Delicious and festive gluten-free gingerbread crinkle cookies that are perfect for the holiday season.
- Prep Time: 15 minutes
- Cook Time: 12 minutes
- Total Time: 1 hour (including chilling time)
- Yield: 24 cookies 1x
- Category: Dessert
- Method: Baking
- Cuisine: American
- Diet: Gluten Free
Ingredients
- 2 cups gluten-free all-purpose flour
- 1/2 cup brown sugar
- 1/4 cup molasses
- 1/4 cup unsalted butter, softened
- 1 large egg
- 1 teaspoon baking soda
- 1 tablespoon ground ginger
- 1 tablespoon ground cinnamon
- 1/2 teaspoon ground cloves
- 1/4 teaspoon salt
- 1/2 cup powdered sugar for rolling
Instructions
- Preheat the oven to 350°F (175°C) and line a baking sheet with parchment paper.
- In a large bowl, cream together the softened butter and brown sugar until light and fluffy.
- Add the molasses and egg, mixing until well combined.
- In another bowl, whisk together the gluten-free flour, baking soda, ginger, cinnamon, cloves, and salt.
- Gradually add the dry ingredients to the wet ingredients, mixing until a dough forms.
- Chill the dough in the refrigerator for at least 30 minutes.
- Once chilled, scoop out tablespoon-sized portions of dough and roll them into balls.
- Roll each ball in powdered sugar until well coated.
- Place the cookies on the prepared baking sheet, spacing them about 2 inches apart.
- Bake for 10-12 minutes or until the edges are set and the tops are crinkled.
- Allow to cool on the baking sheet for a few minutes before transferring to a wire rack to cool completely.
Notes
- For a spicier flavor, increase the amount of ginger and cinnamon.
- Store cookies in an airtight container for up to a week.
- These cookies can be frozen for up to 3 months.
Nutrition
- Serving Size: 1 cookie
- Calories: 120
- Sugar: 10g
- Sodium: 50mg
- Fat: 5g
- Saturated Fat: 3g
- Unsaturated Fat: 2g
- Trans Fat: 0g
- Carbohydrates: 18g
- Fiber: 1g
- Protein: 1g
- Cholesterol: 15mg