
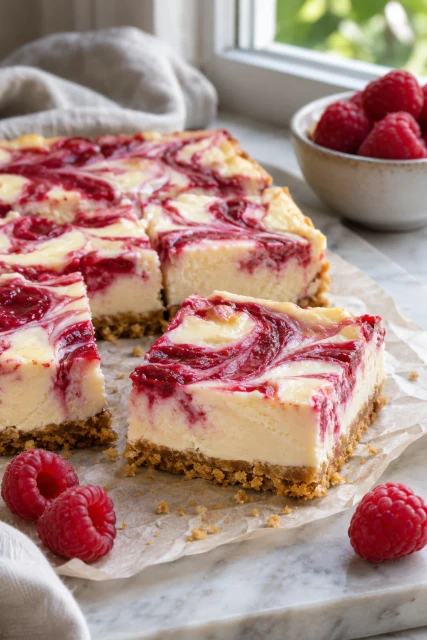
Gluten Free Raspberry Cheesecake Bars
As a busy mom, I know how precious time can be, especially when it comes to whipping up something delicious. That’s why I adore these Gluten Free Raspberry Cheesecake Bars. They’re not just a treat; they’re a quick solution for those hectic days when you want to impress your loved ones without spending hours in the kitchen. The creamy texture paired with the tartness of fresh raspberries creates a delightful balance that everyone will love. Trust me, these bars will become a staple in your dessert repertoire!
Why You’ll Love This Gluten Free Raspberry Cheesecake Bars
These Gluten Free Raspberry Cheesecake Bars are a dream come true for busy moms and professionals alike. They’re incredibly easy to make, requiring just a handful of ingredients and minimal prep time. Plus, the taste is simply divine! The creamy cheesecake combined with the burst of fresh raspberries creates a flavor explosion that will leave your family asking for seconds. You’ll love how quickly they disappear!
Ingredients for Gluten Free Raspberry Cheesecake Bars
Gathering the right ingredients is key to making these delightful Gluten Free Raspberry Cheesecake Bars. Here’s what you’ll need:
- Gluten-free graham cracker crumbs: These form the base of your crust. Make sure to choose a brand that’s certified gluten-free for the best results.
- Unsalted butter: This adds richness to the crust. Using unsalted allows you to control the saltiness of the overall dish.
- Cream cheese: The star of the show! Softened cream cheese gives that creamy texture we all crave in cheesecake.
- Granulated sugar: Sweetness is essential. You can adjust the amount based on your taste preference.
- Large eggs: These help bind everything together and create a smooth filling. Make sure they’re at room temperature for easier mixing.
- Vanilla extract: A splash of vanilla enhances the flavor profile, making the cheesecake even more delicious.
- Fresh raspberries: These provide a burst of tartness and color. Feel free to swap with other berries if you prefer!
For exact measurements, check the bottom of the article where you can find everything listed for easy printing. Happy baking!
How to Make Gluten Free Raspberry Cheesecake Bars
Now that you have your ingredients ready, let’s dive into the fun part—making these delightful Gluten Free Raspberry Cheesecake Bars! Follow these simple steps, and you’ll have a dessert that’s sure to impress.
Step 1: Preheat the Oven
First things first, preheat your oven to 350°F (175°C). Preheating is crucial because it ensures even baking. If you skip this step, your cheesecake bars might not set properly, leaving you with a gooey mess instead of a creamy delight!
Step 2: Prepare the Crust
In a mixing bowl, combine your gluten-free graham cracker crumbs with the melted butter. Stir until everything is well mixed. The mixture should resemble wet sand. Now, press this mixture firmly into the bottom of a greased 9×9 inch baking dish. Pressing it down well is key; it creates a sturdy base that holds the cheesecake filling beautifully.
Step 3: Make the Cheesecake Filling
In another bowl, beat the softened cream cheese and granulated sugar together until smooth and creamy. This step is essential for a lump-free filling. Next, add the eggs one at a time, mixing well after each addition. This method helps incorporate air, making your cheesecake light and fluffy. Finally, stir in the vanilla extract for that extra flavor boost!
Step 4: Fold in the Raspberries
Now comes the fun part—folding in the fresh raspberries! Gently add them to the cheesecake mixture, being careful not to crush them. This technique preserves their integrity, allowing those beautiful bursts of flavor to shine through in every bite.
Step 5: Bake the Bars
Pour the cheesecake mixture over your prepared crust, spreading it evenly. Bake in the preheated oven for 30-35 minutes. To check for doneness, gently shake the pan; the center should be set but still slightly jiggly. Once done, remove from the oven and let it cool in the pan.
Step 6: Chill and Serve
After cooling, refrigerate your cheesecake bars for at least 2 hours. Chilling is vital as it helps the bars firm up, making them easier to cut. Once chilled, slice them into squares and serve. You can even top them with extra raspberries or a dollop of whipped cream for that extra touch!
Tips for Success
- Use room temperature cream cheese for a smoother filling.
- Don’t skip the chilling step; it’s crucial for the perfect texture.
- Press the crust firmly to avoid a crumbly base.
- Feel free to experiment with different berries for a unique twist.
- For a sweeter taste, adjust the sugar to your liking.
Equipment Needed
- 9×9 inch baking dish: A square dish is ideal, but you can use a round one if that’s what you have.
- Mixing bowls: A couple of medium-sized bowls will do the trick for mixing ingredients.
- Electric mixer: A hand mixer works great, but a whisk can be used if you’re feeling strong!
- Spatula: Essential for folding in those lovely raspberries and spreading the filling.
Variations
- Chocolate Swirl: Add a swirl of melted dark chocolate to the cheesecake mixture for a rich, decadent twist.
- Nutty Crust: Substitute half of the graham cracker crumbs with finely ground almonds or walnuts for added flavor and texture.
- Vegan Option: Use vegan cream cheese and flax eggs as a substitute for a dairy-free version.
- Different Berries: Swap raspberries for blueberries, strawberries, or blackberries to create your favorite berry cheesecake bars.
- Citrus Zest: Add a teaspoon of lemon or orange zest to the filling for a refreshing citrus flavor.
Serving Suggestions
- Pair these bars with a scoop of vanilla ice cream for a delightful contrast.
- Serve alongside a fresh fruit salad to enhance the berry flavors.
- Drizzle with chocolate sauce for an indulgent touch.
- Garnish with mint leaves for a pop of color and freshness.
- Enjoy with a cup of herbal tea or coffee for a cozy dessert experience.
FAQs about Gluten Free Raspberry Cheesecake Bars
As you embark on your baking adventure with these Gluten Free Raspberry Cheesecake Bars, you might have a few questions. Here are some common queries that can help you along the way:
Can I use frozen raspberries instead of fresh?
Absolutely! Frozen raspberries work well, but make sure to thaw and drain them first. This prevents excess moisture from affecting the cheesecake texture.
How do I store leftover cheesecake bars?
Store any leftovers in an airtight container in the refrigerator. They’ll stay fresh for up to five days, but I doubt they’ll last that long!
Can I make these bars ahead of time?
Yes! These bars are perfect for making ahead. Just prepare them a day in advance and let them chill overnight for the best flavor.
What can I substitute for cream cheese?
If you’re looking for a dairy-free option, try using vegan cream cheese. It provides a similar creamy texture without the dairy.
Can I double the recipe?
Of course! Just use a larger baking dish and adjust the baking time slightly. Keep an eye on them to ensure they bake evenly.
Summarizing the Joy of Gluten Free Raspberry Cheesecake Bars
There’s something truly magical about these Gluten Free Raspberry Cheesecake Bars. They bring a sense of joy and satisfaction that’s hard to beat. Each bite is a delightful blend of creamy cheesecake and tart raspberries, creating a symphony of flavors that dance on your palate. Whether you’re serving them at a family gathering or enjoying a quiet evening at home, these bars are sure to impress. Plus, knowing they’re gluten-free means everyone can indulge without worry. So, roll up your sleeves and dive into this delicious adventure—you won’t regret it!
PrintGluten Free Raspberry Cheesecake Bars You’ll Love!
Delicious and creamy gluten-free raspberry cheesecake bars that are perfect for dessert lovers.
- Prep Time: 15 minutes
- Cook Time: 35 minutes
- Total Time: 2 hours 50 minutes
- Yield: 16 bars 1x
- Category: Dessert
- Method: Baking
- Cuisine: American
- Diet: Gluten Free
Ingredients
- 1 ½ cups gluten-free graham cracker crumbs
- ½ cup unsalted butter, melted
- 2 cups cream cheese, softened
- 1 cup granulated sugar
- 2 large eggs
- 1 teaspoon vanilla extract
- 1 cup fresh raspberries
Instructions
- Preheat the oven to 350°F (175°C).
- In a bowl, mix gluten-free graham cracker crumbs with melted butter until combined.
- Press the mixture into the bottom of a greased 9×9 inch baking dish.
- In a separate bowl, beat the cream cheese and sugar until smooth.
- Add eggs one at a time, mixing well after each addition, then stir in vanilla extract.
- Gently fold in the raspberries.
- Pour the cheesecake mixture over the crust in the baking dish.
- Bake for 30-35 minutes or until the center is set.
- Allow to cool, then refrigerate for at least 2 hours before cutting into bars.
Notes
- For a sweeter taste, add more sugar to the cheesecake mixture.
- Make sure to use gluten-free graham crackers for the crust.
- These bars can be topped with additional raspberries or whipped cream before serving.
Nutrition
- Serving Size: 1 bar
- Calories: 210
- Sugar: 12g
- Sodium: 150mg
- Fat: 14g
- Saturated Fat: 8g
- Unsaturated Fat: 4g
- Trans Fat: 0g
- Carbohydrates: 18g
- Fiber: 1g
- Protein: 3g
- Cholesterol: 50mg