
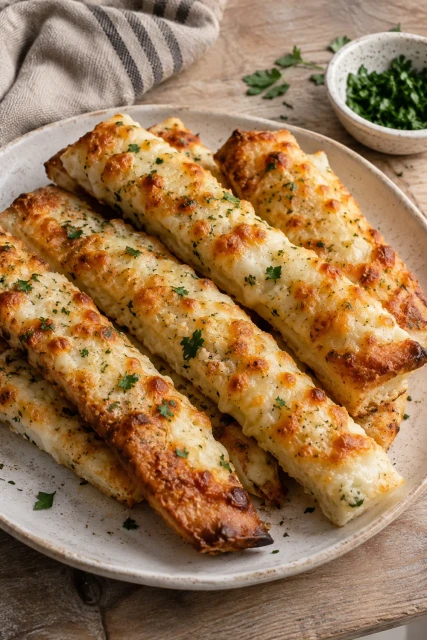
Gluten Free Cheesy Garlic Breadsticks
As a busy mom, I know how precious time can be, especially when it comes to meal prep. That’s why I absolutely adore these Gluten Free Cheesy Garlic Breadsticks! They’re not just a quick solution for a hectic day; they’re also a delightful treat that can impress your loved ones. Imagine pulling a tray of warm, cheesy goodness from the oven, filling your kitchen with that irresistible garlic aroma. Whether it’s a family dinner or a cozy movie night, these breadsticks are sure to be a hit. Trust me, you won’t be able to resist!
Why You’ll Love This Gluten Free Cheesy Garlic Breadsticks
These Gluten Free Cheesy Garlic Breadsticks are a game-changer for busy lives. They come together in just 35 minutes, making them perfect for those nights when time is tight. The taste? Oh, it’s heavenly! With gooey mozzarella and a hint of garlic, every bite is a flavor explosion. Plus, they’re gluten-free, so everyone can enjoy them without worry. You’ll find yourself making these again and again!
Ingredients for Gluten Free Cheesy Garlic Breadsticks
Gathering the right ingredients is key to making these delightful Gluten Free Cheesy Garlic Breadsticks. Here’s what you’ll need:
- Gluten-free all-purpose flour: This is the base of our breadsticks, providing structure without the gluten.
- Baking powder: This helps the breadsticks rise, giving them that fluffy texture we all love.
- Garlic powder: A must for that rich garlic flavor that makes these breadsticks irresistible.
- Salt: Enhances all the flavors, making each bite more delicious.
- Shredded mozzarella cheese: The star ingredient! It melts beautifully, creating that gooey, cheesy goodness.
- Milk: Adds moisture to the dough, helping it come together smoothly.
- Olive oil: This adds richness and helps keep the breadsticks tender.
- Grated Parmesan cheese: A sprinkle on top for an extra cheesy kick and a lovely golden finish.
- Fresh parsley: Adds a pop of color and freshness, making these breadsticks even more appealing.
For those looking to customize, consider adding Italian herbs for an extra flavor boost. You can also substitute the mozzarella with a dairy-free cheese if you’re looking for a vegan option. All ingredient quantities are listed at the bottom of the article for easy printing!
How to Make Gluten Free Cheesy Garlic Breadsticks
Step 1: Preheat the Oven
Preheating your oven is crucial for achieving that perfect golden crust. Set your oven to 400°F (200°C) and let it warm up while you prepare the dough. This ensures even baking and helps the breadsticks rise beautifully, giving them that delightful texture we all crave.
Step 2: Mix Dry Ingredients
In a large bowl, combine the gluten-free all-purpose flour, baking powder, garlic powder, and salt. Whisk them together until well blended. This step is essential as it evenly distributes the leavening agents and flavors throughout the dough. You want every bite to be packed with that delicious garlic goodness!
Step 3: Add Wet Ingredients
Now, it’s time to bring the dough to life! Add the shredded mozzarella cheese, milk, and olive oil to your dry mixture. Stir everything together until a dough forms. It should be slightly sticky but manageable. The cheese will melt into the dough, creating that irresistible cheesy flavor we all love.
Step 4: Knead the Dough
Transfer the dough to a floured surface and knead it gently for about a minute. You want to work it just enough to bring it together without overdoing it. The dough should be soft and slightly tacky, not dry or crumbly. This gentle kneading helps develop the texture.
Step 5: Roll Out the Dough
Using a rolling pin, roll the dough into a rectangle about 1/2 inch thick. Make sure to keep the surface lightly floured to prevent sticking. This thickness is perfect for achieving that soft inside and slightly crispy outside. Plus, it makes cutting the breadsticks easier!
Step 6: Cut into Strips
With a sharp knife or pizza cutter, slice the rolled-out dough into strips. Aim for about 1 inch wide for each breadstick. Don’t worry about making them perfect; a little rustic charm adds to their appeal. Each strip will puff up beautifully while baking!
Step 7: Prepare for Baking
Line a baking sheet with parchment paper and place your cut breadsticks on it, leaving some space between each one. This allows them to expand while baking. Sprinkle the grated Parmesan cheese and chopped parsley on top for that extra flavor and a pop of color!
Step 8: Bake to Perfection
Pop the baking sheet into your preheated oven and bake for 15-20 minutes. Keep an eye on them! You want them to turn golden brown and slightly crispy on the edges. A quick tap on the top should sound hollow when they’re done. Enjoy the heavenly aroma filling your kitchen!
Tips for Success
- Use a kitchen scale for precise measurements, especially with gluten-free flour.
- Let the dough rest for a few minutes before rolling; it makes it easier to handle.
- Experiment with different cheeses for unique flavors—cheddar or gouda work great!
- For extra crunch, brush the tops with olive oil before baking.
- Don’t skip the parchment paper; it prevents sticking and makes cleanup a breeze!
Equipment Needed
- Mixing bowl: A large bowl for combining ingredients. A sturdy pot can work in a pinch.
- Rolling pin: Essential for rolling out the dough. A wine bottle can serve as a fun alternative!
- Baking sheet: Needed for baking the breadsticks. Any flat oven-safe dish will do.
- Parchment paper: Helps prevent sticking. Aluminum foil can be used if necessary.
- Knife or pizza cutter: For cutting the dough into strips. A sharp kitchen scissors can also work!
Variations
- Herb-Infused: Add dried Italian herbs like oregano or basil to the dough for an aromatic twist.
- Spicy Kick: Mix in some red pepper flakes for a bit of heat that pairs perfectly with the garlic.
- Cheesy Delight: Swap out mozzarella for a blend of cheeses like cheddar and Monterey Jack for a richer flavor.
- Vegan Option: Use a dairy-free cheese alternative and plant-based milk to make these breadsticks vegan-friendly.
- Stuffed Breadsticks: Roll the dough around your favorite fillings, like pepperoni or spinach and feta, for a fun surprise!
Serving Suggestions
- Pair these Gluten Free Cheesy Garlic Breadsticks with a warm marinara sauce for dipping.
- Serve alongside a fresh garden salad for a balanced meal.
- Complement with a glass of crisp white wine or sparkling water.
- For a cozy presentation, arrange them in a basket lined with a colorful cloth.
FAQs about Gluten Free Cheesy Garlic Breadsticks
Can I make these breadsticks ahead of time?
Absolutely! You can prepare the dough and cut the breadsticks in advance. Just store them in the fridge for up to 24 hours before baking. This makes it super convenient for busy nights!
What can I serve with Gluten Free Cheesy Garlic Breadsticks?
These breadsticks pair wonderfully with marinara sauce, but you can also serve them with a creamy ranch dip or a zesty pesto. They’re versatile enough to complement any meal!
How do I store leftovers?
Store any leftover breadsticks in an airtight container at room temperature for up to two days. You can also freeze them for longer storage. Just reheat in the oven for that fresh-baked taste!
Can I use a different type of cheese?
Definitely! While mozzarella is a classic choice, feel free to experiment with other cheeses like cheddar or gouda. Each will bring its own unique flavor to your Gluten Free Cheesy Garlic Breadsticks!
Are these breadsticks suitable for kids?
Yes! Kids love the cheesy, garlicky flavor, and since they’re gluten-free, they’re a safe option for little ones with dietary restrictions. Plus, they’re fun to dip!
Summarizing the Joy of Gluten Free Cheesy Garlic Breadsticks
There’s something truly magical about pulling a tray of Gluten Free Cheesy Garlic Breadsticks from the oven. The warm, cheesy aroma fills the air, instantly lifting spirits and creating a cozy atmosphere. Each bite is a delightful blend of flavors, making them perfect for any occasion. Whether you’re sharing them with family or enjoying them solo, these breadsticks bring joy and comfort. They’re not just a recipe; they’re a delicious way to create memories. So, gather your loved ones, dip into some marinara, and savor the happiness these breadsticks bring to your table!
PrintGluten Free Cheesy Garlic Breadsticks You Can’t Resist!

Delicious and cheesy garlic breadsticks that are gluten-free and perfect for any occasion.
- Prep Time: 15 minutes
- Cook Time: 20 minutes
- Total Time: 35 minutes
- Yield: 12 breadsticks 1x
- Category: Appetizer
- Method: Baking
- Cuisine: Italian
- Diet: Gluten Free
Ingredients
- 2 cups gluten-free all-purpose flour
- 1 tablespoon baking powder
- 1 teaspoon garlic powder
- 1 teaspoon salt
- 1 cup shredded mozzarella cheese
- 1/2 cup milk
- 1/4 cup olive oil
- 1/4 cup grated Parmesan cheese
- 2 tablespoons fresh parsley, chopped
Instructions
- Preheat the oven to 400°F (200°C).
- In a large bowl, mix together the gluten-free flour, baking powder, garlic powder, and salt.
- Add the shredded mozzarella cheese, milk, and olive oil to the dry ingredients and mix until a dough forms.
- Transfer the dough to a floured surface and knead gently.
- Roll out the dough into a rectangle about 1/2 inch thick.
- Cut the dough into strips to form breadsticks.
- Place the breadsticks on a baking sheet lined with parchment paper.
- Sprinkle the grated Parmesan cheese and chopped parsley on top.
- Bake for 15-20 minutes or until golden brown.
- Serve warm and enjoy!
Notes
- For extra flavor, add Italian herbs to the dough.
- These breadsticks can be frozen and reheated later.
- Serve with marinara sauce for dipping.
Nutrition
- Serving Size: 1 breadstick
- Calories: 150
- Sugar: 1g
- Sodium: 200mg
- Fat: 8g
- Saturated Fat: 3g
- Unsaturated Fat: 5g
- Trans Fat: 0g
- Carbohydrates: 15g
- Fiber: 1g
- Protein: 5g
- Cholesterol: 15mg