
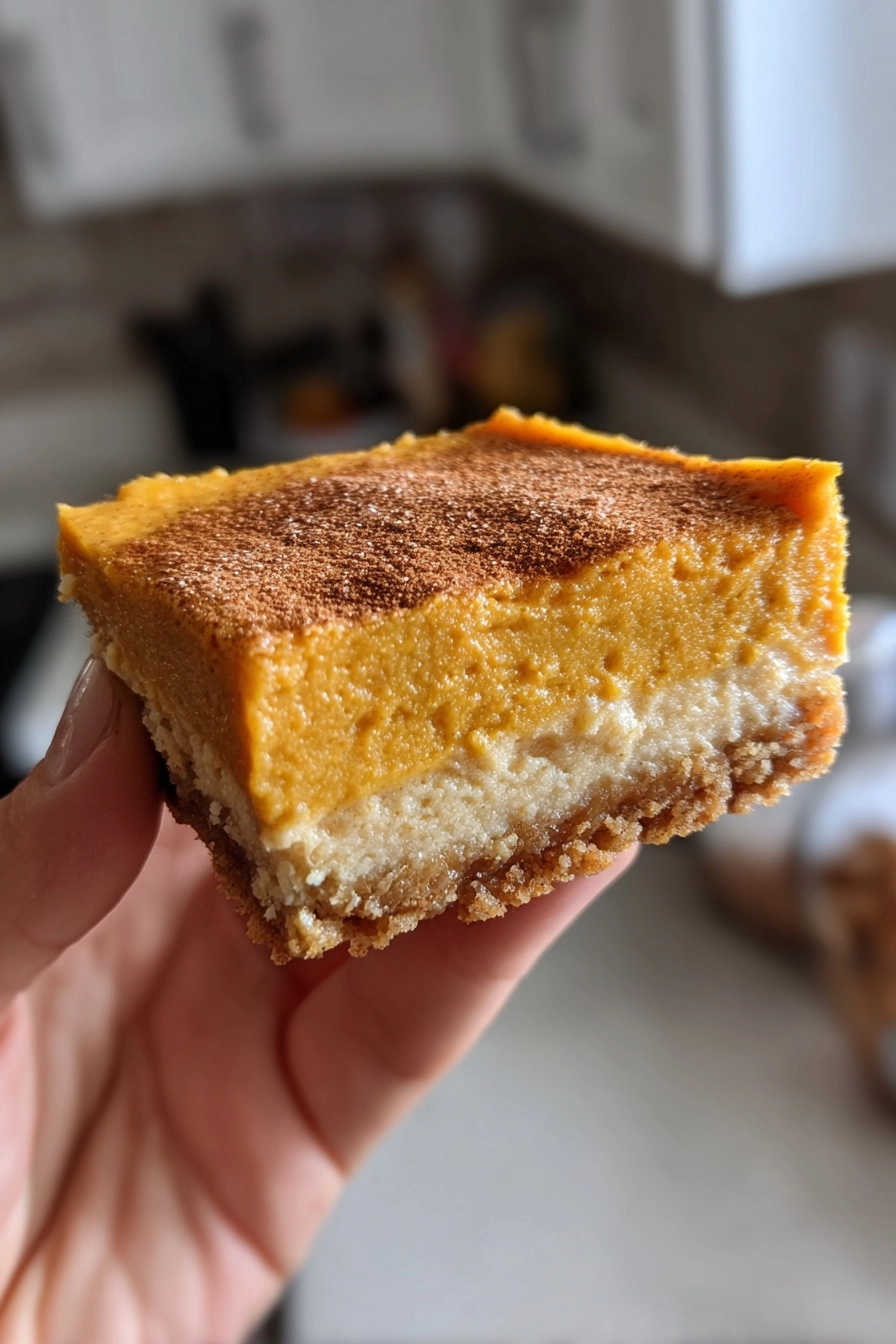
Gluten-Free Pumpkin Cheesecake Bars
As the leaves turn and the air gets crisp, I find myself craving the warm, cozy flavors of fall. That’s where these Gluten-Free Pumpkin Cheesecake Bars come in! They’re not just a dessert; they’re a hug in a pan, perfect for busy days when you want to whip up something special without spending hours in the kitchen. Whether you’re hosting a gathering or just treating your family, these bars are sure to impress. Trust me, they’ll disappear faster than you can say “pumpkin spice!”
Why You’ll Love This Gluten-Free Pumpkin Cheesecake Bars
These Gluten-Free Pumpkin Cheesecake Bars are a delightful blend of creamy and spiced goodness, making them a must-try for any fall gathering. They’re incredibly easy to make, requiring just a handful of ingredients and minimal prep time. Plus, they’re gluten-free, so everyone can enjoy them! With their rich flavor and smooth texture, these bars are sure to become a family favorite, bringing smiles to faces young and old.
Ingredients for Gluten-Free Pumpkin Cheesecake Bars
Gathering the right ingredients is the first step to creating these delightful Gluten-Free Pumpkin Cheesecake Bars. Here’s what you’ll need:
- Gluten-free graham cracker crumbs: These form the base of your bars, providing a sweet and crunchy texture. You can find them in most grocery stores or make your own by crushing gluten-free crackers.
- Unsalted butter: Melted butter binds the crust together and adds richness. If you prefer a dairy-free option, coconut oil works well too.
- Sugar: A touch of sweetness is essential. You can use regular granulated sugar or opt for coconut sugar for a healthier twist.
- Cream cheese: This is the star of the filling, giving it that creamy, luscious texture. Full-fat cream cheese is recommended for the best flavor.
- Pumpkin puree: The heart of the recipe! It adds moisture and that classic pumpkin flavor. Make sure to use pure pumpkin puree, not pumpkin pie filling.
- Eggs: They help set the filling, giving it structure. For a vegan alternative, you can use flax eggs or a commercial egg replacer.
- Vanilla extract: A splash of vanilla enhances the overall flavor, making it even more delicious.
- Ground cinnamon, nutmeg, and ginger: These spices bring warmth and depth to the bars, evoking the essence of fall. Feel free to adjust the amounts to suit your taste.
- Salt: Just a pinch balances the sweetness and enhances the flavors.
For exact measurements, check the bottom of the article where you can find everything listed for easy printing!
How to Make Gluten-Free Pumpkin Cheesecake Bars
Now that you have your ingredients ready, let’s dive into the fun part: making these Gluten-Free Pumpkin Cheesecake Bars! Follow these simple steps, and you’ll have a delicious dessert that will wow your family and friends.
Step 1: Preheat the Oven
First things first, preheat your oven to 350°F (175°C). Preheating is crucial because it ensures even baking. If you skip this step, your bars might not set properly, and nobody wants a gooey mess!
Step 2: Prepare the Crust
In a mixing bowl, combine the gluten-free graham cracker crumbs, melted butter, and sugar. Stir until everything is well mixed. The mixture should resemble wet sand. Now, press it firmly into the bottom of a greased 9×13 inch baking dish. Pressing it down well is key; it helps create a sturdy base for your cheesecake filling.
Step 3: Bake the Crust
Pop the crust into the preheated oven and bake for about 10 minutes. You’ll know it’s ready when it’s lightly golden and fragrant. Let it cool for a few minutes before adding the filling. This cooling time is essential to keep the layers distinct.
Step 4: Make the Cheesecake Filling
In a large mixing bowl, beat the softened cream cheese until it’s smooth and creamy. Then, add the pumpkin puree, sugar, eggs, vanilla extract, cinnamon, nutmeg, ginger, and salt. Mix until everything is well combined and silky. This step is where the magic happens, so take your time to ensure a smooth texture!
Step 5: Combine and Pour
Once your filling is ready, pour it over the cooled crust. Use a spatula to spread it evenly. This ensures every bite is packed with that delicious pumpkin cheesecake flavor. Don’t be shy; make sure it’s nice and even!
Step 6: Bake the Bars
Return the dish to the oven and bake for an additional 30-35 minutes. Keep an eye on it! The center should be set but still slightly jiggly. A toothpick inserted in the center should come out clean or with just a few moist crumbs. This is the perfect doneness for a creamy texture.
Step 7: Chill and Serve
After baking, let the bars cool completely at room temperature. Then, refrigerate them for at least 2 hours before serving. Chilling is vital; it helps the bars firm up and enhances the flavors. Trust me, the wait will be worth it!
Tips for Success
- Use room temperature cream cheese for a smoother filling.
- Don’t skip the chilling step; it’s key for the best texture.
- For a fun twist, add chocolate chips to the filling.
- Keep an eye on the baking time; ovens can vary.
- Serve with a dollop of whipped cream for extra indulgence!
Equipment Needed
- 9×13 inch baking dish: A standard size for these bars; you can also use an 8×8 inch dish for thicker bars.
- Mixing bowls: A large bowl for the filling and a smaller one for the crust.
- Electric mixer: A hand mixer works great, but a whisk can do the job too if you’re feeling strong!
- Spatula: Perfect for spreading the filling evenly over the crust.
- Measuring cups and spoons: Essential for accurate ingredient amounts.
Variations
- Chocolate Swirl: Add a swirl of melted chocolate to the filling for a decadent twist. Just drop spoonfuls of melted chocolate and use a knife to create a marbled effect.
- Nutty Crust: Substitute half of the graham cracker crumbs with finely chopped nuts, like pecans or almonds, for added crunch and flavor.
- Spiced Up: Experiment with additional spices like allspice or cloves to enhance the fall flavors even more.
- Vegan Option: Use vegan cream cheese and flax eggs to make these bars completely plant-based while still delicious.
- Maple Sweetener: Replace granulated sugar with maple syrup or coconut sugar for a more natural sweetness.
Serving Suggestions
- Pair these Gluten-Free Pumpkin Cheesecake Bars with a warm cup of spiced chai or apple cider for a cozy treat.
- Top with a dollop of whipped cream or a sprinkle of cinnamon for an elegant touch.
- Serve alongside fresh fruit, like sliced apples or pears, for a refreshing contrast.
- For a festive presentation, arrange the bars on a decorative platter with fall leaves.
FAQs about Gluten-Free Pumpkin Cheesecake Bars
As I’ve shared my love for these Gluten-Free Pumpkin Cheesecake Bars, I often get questions from fellow home cooks. Here are some of the most common queries, along with my answers to help you on your baking journey!
Can I use pumpkin pie filling instead of pumpkin puree?
While you can use pumpkin pie filling, I recommend sticking with pure pumpkin puree. The pie filling contains added spices and sugar, which can alter the flavor and texture of your bars.
How do I store leftovers?
Store any leftover bars in an airtight container in the refrigerator. They’ll stay fresh for up to 5 days, making them a perfect treat for those busy weeknights!
Can I freeze these bars?
Absolutely! These Gluten-Free Pumpkin Cheesecake Bars freeze beautifully. Just wrap them tightly in plastic wrap and then in foil. They can be frozen for up to 3 months. Thaw in the fridge before serving.
What can I substitute for cream cheese?
If you’re looking for a dairy-free option, vegan cream cheese works well. You can also try cashew cream for a nut-based alternative, but the texture may vary slightly.
Can I make these bars ahead of time?
Yes! In fact, making them a day in advance allows the flavors to meld beautifully. Just remember to chill them overnight for the best texture!
Summarizing the Joy of Gluten-Free Pumpkin Cheesecake Bars
There’s something truly magical about these Gluten-Free Pumpkin Cheesecake Bars. They capture the essence of fall in every bite, bringing warmth and comfort to your table. Whether you’re sharing them with family during a cozy gathering or enjoying a quiet moment with a cup of tea, these bars create memories that linger long after the last crumb is gone. The blend of creamy pumpkin and warm spices is like a sweet serenade for your taste buds. So, roll up your sleeves and indulge in this delightful treat that’s sure to become a cherished favorite!
PrintGluten-Free Pumpkin Cheesecake Bars to Delight Your Tastebuds!
Delicious and creamy gluten-free pumpkin cheesecake bars that are perfect for fall and holiday gatherings.
- Prep Time: 20 minutes
- Cook Time: 45 minutes
- Total Time: 1 hour 5 minutes
- Yield: 12 bars 1x
- Category: Dessert
- Method: Baking
- Cuisine: American
- Diet: Gluten Free
Ingredients
- 1 ½ cups gluten-free graham cracker crumbs
- ½ cup unsalted butter, melted
- 2 tablespoons sugar
- 2 (8 oz) packages cream cheese, softened
- 1 cup pumpkin puree
- 1 cup sugar
- 3 large eggs
- 1 teaspoon vanilla extract
- 1 teaspoon ground cinnamon
- ½ teaspoon ground nutmeg
- ½ teaspoon ground ginger
- ¼ teaspoon salt
Instructions
- Preheat the oven to 350°F (175°C).
- In a bowl, mix gluten-free graham cracker crumbs, melted butter, and sugar until combined.
- Press the mixture into the bottom of a greased 9×13 inch baking dish.
- Bake the crust for 10 minutes, then remove from the oven and let cool.
- In a large mixing bowl, beat the cream cheese until smooth.
- Add pumpkin puree, sugar, eggs, vanilla, cinnamon, nutmeg, ginger, and salt. Mix until well combined.
- Pour the pumpkin mixture over the cooled crust and spread evenly.
- Bake for an additional 30-35 minutes, or until the center is set.
- Let cool completely before cutting into bars.
- Refrigerate for at least 2 hours before serving.
Notes
- For a richer flavor, use full-fat cream cheese.
- These bars can be topped with whipped cream or a dusting of powdered sugar before serving.
- Store leftovers in the refrigerator for up to 5 days.
Nutrition
- Serving Size: 1 bar
- Calories: 250
- Sugar: 15g
- Sodium: 200mg
- Fat: 15g
- Saturated Fat: 9g
- Unsaturated Fat: 4g
- Trans Fat: 0g
- Carbohydrates: 28g
- Fiber: 1g
- Protein: 4g
- Cholesterol: 60mg