
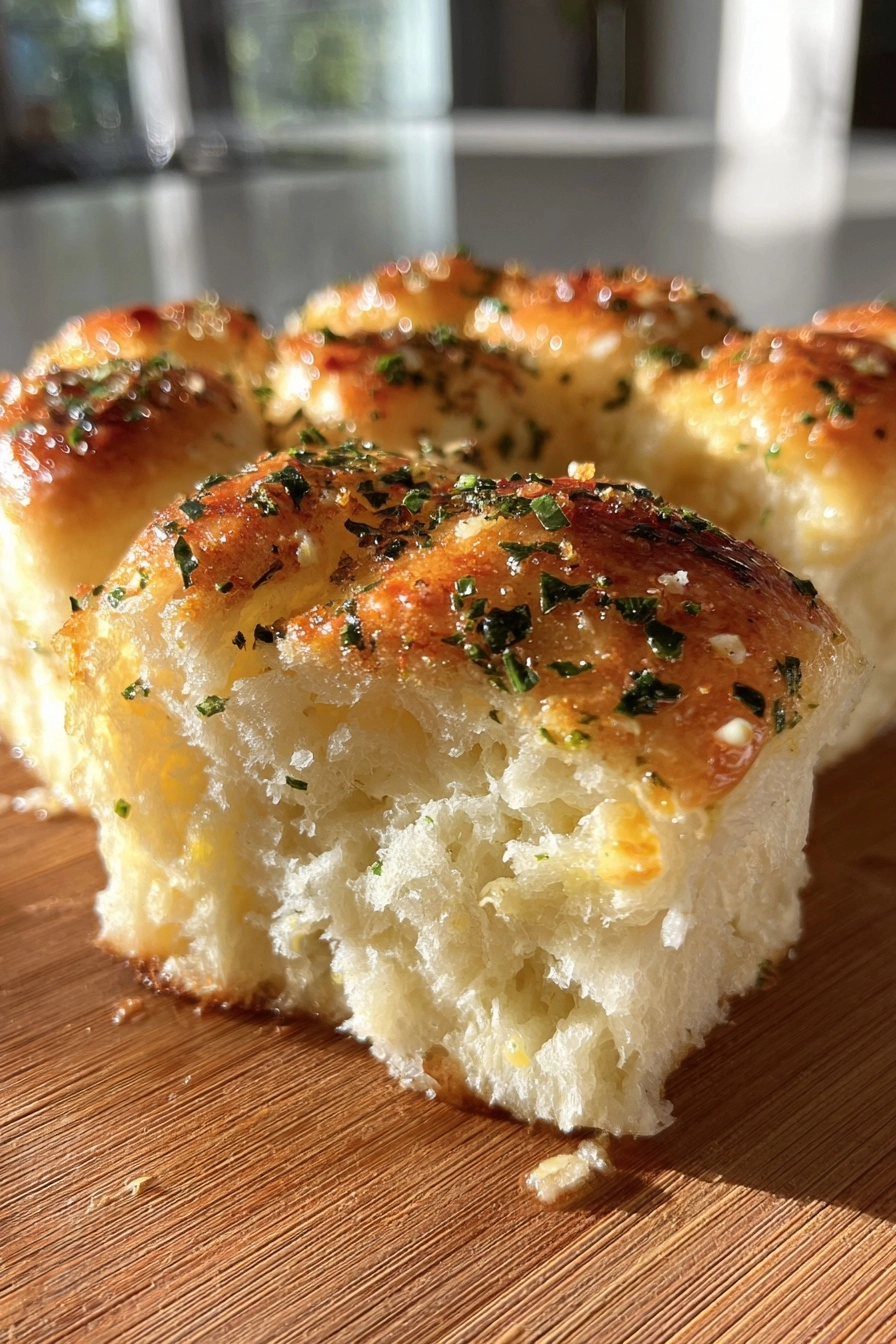
Introduction to Garlic Bread Rolls
There’s something magical about the aroma of freshly baked Garlic Bread Rolls wafting through the kitchen. It instantly transforms any meal into a cozy gathering. As a busy mom, I know how precious time is, and these rolls are a quick solution for those hectic weeknights. They’re soft, buttery, and bursting with garlic flavor, making them the perfect sidekick to pasta, soups, or even a simple salad. Plus, they’re so easy to whip up that you’ll impress your loved ones without breaking a sweat. Let’s dive into this delightful recipe!
Why You’ll Love This Garlic Bread Rolls
These Garlic Bread Rolls are a game-changer for busy evenings. They come together quickly, making them perfect for last-minute dinners. The taste? Absolutely divine! Each roll is soft and buttery, with a punch of garlic that dances on your taste buds. Plus, they’re versatile enough to pair with almost any dish. Trust me, once you try them, they’ll become a staple in your kitchen!
Ingredients for Garlic Bread Rolls
Gathering the right ingredients is the first step to creating these delightful Garlic Bread Rolls. Here’s what you’ll need:
- All-purpose flour: The backbone of your rolls, providing structure and softness.
- Active dry yeast: This little powerhouse helps your rolls rise, giving them that fluffy texture.
- Warm water: Activates the yeast, ensuring your rolls rise beautifully.
- Milk: Adds richness and moisture, making the rolls tender and delicious.
- Unsalted butter: For that buttery flavor and soft texture; melted for easy mixing.
- Garlic: Freshly minced garlic infuses the rolls with a bold, savory flavor.
- Sugar: A touch of sweetness that helps activate the yeast and balances the flavors.
- Salt: Enhances the overall taste, making every bite more flavorful.
- Fresh parsley: Adds a pop of color and a fresh, herbal note to the rolls.
For those looking to elevate the flavor, consider adding grated Parmesan cheese to the garlic butter mixture. If you’re short on time, you can use pre-minced garlic, but fresh is always best for that vibrant taste. You can find all the exact measurements at the bottom of the article, ready for printing!
How to Make Garlic Bread Rolls
Now that you have your ingredients ready, let’s get started on making these delightful Garlic Bread Rolls. Follow these simple steps, and you’ll have warm, buttery rolls in no time!
Step 1: Activate the Yeast
In a small bowl, combine warm water, sugar, and active dry yeast. Stir gently and let it sit for about 5-10 minutes. You’ll know it’s ready when it becomes frothy and bubbly. This step is crucial; it wakes up the yeast, ensuring your rolls rise beautifully.
Step 2: Prepare the Dough
In a large mixing bowl, combine all-purpose flour and salt. Make a well in the center and pour in the yeast mixture, milk, and melted unsalted butter. Mix everything together until a dough starts to form. It should be slightly sticky but manageable. If it’s too dry, add a splash of warm water.
Step 3: Knead the Dough
Lightly flour your work surface and turn the dough out onto it. Knead the dough for about 5 minutes. You want it to be smooth and elastic. This step is like giving your dough a little workout, helping it develop that perfect texture.
Step 4: Let the Dough Rise
Place the kneaded dough in a greased bowl, cover it with a clean kitchen towel, and let it rise in a warm spot. Aim for about 1 hour or until it doubles in size. This is the magic moment when the yeast does its job, creating fluffy rolls.
Step 5: Shape the Rolls
Once the dough has risen, punch it down gently to release the air. Divide it into 12 equal pieces. Shape each piece into a roll by tucking the edges underneath. Place them on a baking sheet lined with parchment paper, leaving some space between each roll.
Step 6: Prepare the Garlic Butter
In a small bowl, mix melted butter, minced garlic, and chopped parsley. This garlic butter mixture is what makes these rolls sing! Brush it generously over the shaped rolls, ensuring every nook and cranny is coated.
Step 7: Bake the Rolls
Preheat your oven to 375°F (190°C). Bake the rolls for 15-20 minutes or until they turn golden brown. The aroma will fill your kitchen, making it hard to resist. Once they’re done, serve them warm and watch your family devour them!
Tips for Success
- Always use warm water, not hot, to activate the yeast properly.
- For fluffier rolls, knead the dough until it’s smooth and elastic.
- Let the dough rise in a warm, draft-free area for best results.
- Brush the garlic butter on the rolls right before baking for maximum flavor.
- Experiment with herbs like rosemary or thyme for a unique twist!
Equipment Needed
- Mixing bowl: A large bowl for combining ingredients; any bowl will do!
- Measuring cups and spoons: Essential for accuracy; use a kitchen scale if you prefer.
- Rolling pin: Handy for kneading; your hands work just as well!
- Baking sheet: A flat surface for baking; a casserole dish can work too.
- Kitchen towel: To cover the dough; a clean cloth or plastic wrap is fine.
Variations of Garlic Bread Rolls
- Cheesy Garlic Rolls: Add shredded mozzarella or cheddar cheese to the dough for a gooey, cheesy surprise inside.
- Herb-Infused Rolls: Mix in dried herbs like oregano or basil into the dough for an aromatic twist.
- Whole Wheat Option: Substitute half of the all-purpose flour with whole wheat flour for a healthier version.
- Spicy Garlic Rolls: Add a pinch of red pepper flakes to the garlic butter for a kick of heat.
- Vegan Garlic Rolls: Replace butter with olive oil and use plant-based milk for a dairy-free option.
Serving Suggestions for Garlic Bread Rolls
- Pair these rolls with a rich marinara sauce for dipping; it’s a match made in heaven!
- Serve alongside a fresh garden salad for a light, balanced meal.
- Complement with a glass of red wine for a cozy dinner vibe.
- For a fun presentation, arrange the rolls in a basket lined with a colorful cloth.
FAQs about Garlic Bread Rolls
Can I make Garlic Bread Rolls ahead of time?
Absolutely! You can prepare the dough and let it rise, then shape the rolls and refrigerate them overnight. Just let them come to room temperature before baking. This is a great time-saver for busy evenings!
What can I do if my rolls don’t rise?
If your rolls don’t rise, it could be due to inactive yeast. Make sure your yeast is fresh and that the water is warm, not hot. If it’s too cold, the yeast won’t activate properly.
Can I freeze Garlic Bread Rolls?
Yes! These rolls freeze beautifully. After baking, let them cool completely, then store them in an airtight container. Reheat in the oven for a few minutes before serving for that fresh-baked taste.
How can I adjust the garlic flavor?
If you love garlic, feel free to add more minced garlic to the butter mixture. For a milder flavor, you can reduce the amount or even use roasted garlic for a sweeter, more subtle taste.
What dishes pair well with Garlic Bread Rolls?
These rolls are incredibly versatile! They pair wonderfully with pasta dishes, soups, or salads. You can even serve them with a charcuterie board for a delightful appetizer!
Final Thoughts
Making Garlic Bread Rolls is more than just a cooking task; it’s a delightful experience that brings warmth to your kitchen and joy to your table. The soft, buttery texture combined with the rich garlic flavor creates a comforting side dish that everyone will love. Whether you’re serving them at a family dinner or enjoying them with a cozy bowl of soup, these rolls are sure to impress. Plus, the smiles on your loved ones’ faces as they savor each bite? That’s the real reward. So, roll up your sleeves and let the magic happen!
PrintGarlic Bread Rolls: Transform Your Dinner with Ease!
Garlic Bread Rolls are a delicious and easy-to-make side dish that can elevate any dinner. These rolls are soft, buttery, and infused with garlic flavor, making them a perfect accompaniment to pasta, soups, or salads.
- Prep Time: 15 minutes
- Cook Time: 20 minutes
- Total Time: 1 hour 35 minutes
- Yield: 12 rolls 1x
- Category: Side Dish
- Method: Baking
- Cuisine: Italian
- Diet: Vegetarian
Ingredients
- 2 cups all-purpose flour
- 1 packet (2 1/4 tsp) active dry yeast
- 1/2 cup warm water
- 1/4 cup milk
- 1/4 cup unsalted butter, melted
- 2 cloves garlic, minced
- 1 tsp sugar
- 1 tsp salt
- 1/4 cup fresh parsley, chopped
Instructions
- In a small bowl, combine warm water, sugar, and yeast. Let it sit for 5-10 minutes until frothy.
- In a large mixing bowl, combine flour and salt. Add the yeast mixture, milk, and melted butter. Mix until a dough forms.
- Knead the dough on a floured surface for about 5 minutes until smooth.
- Place the dough in a greased bowl, cover, and let it rise in a warm place for 1 hour or until doubled in size.
- Preheat the oven to 375°F (190°C).
- Punch down the dough and divide it into 12 equal pieces. Shape each piece into a roll and place them on a baking sheet.
- In a small bowl, mix melted butter, minced garlic, and chopped parsley. Brush the mixture over the rolls.
- Bake for 15-20 minutes or until golden brown.
- Serve warm and enjoy!
Notes
- For extra flavor, add grated Parmesan cheese to the garlic butter mixture.
- These rolls can be frozen after baking; reheat in the oven before serving.
- Adjust the amount of garlic according to your taste preference.
Nutrition
- Serving Size: 1 roll
- Calories: 150
- Sugar: 1g
- Sodium: 200mg
- Fat: 7g
- Saturated Fat: 4g
- Unsaturated Fat: 2g
- Trans Fat: 0g
- Carbohydrates: 20g
- Fiber: 1g
- Protein: 3g
- Cholesterol: 15mg