
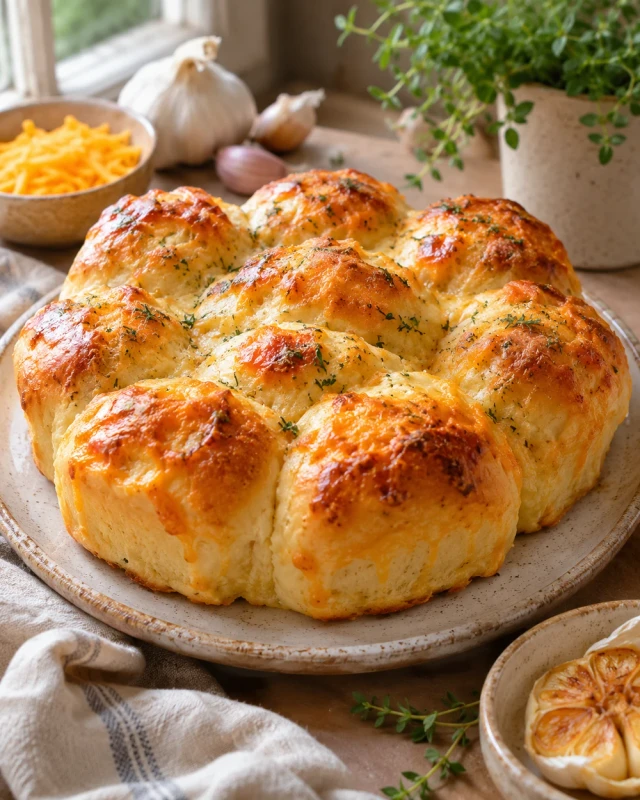
Gluten Free Roasted Garlic Cheddar Dinner Rolls
As a busy mom, I know how precious time can be, especially when it comes to meal prep. That’s why I absolutely adore these Gluten Free Roasted Garlic Cheddar Dinner Rolls. They’re not just a quick solution for a hectic day; they’re also a delightful way to impress your loved ones. Imagine the aroma of roasted garlic wafting through your kitchen, mingling with the rich scent of melted cheddar. These rolls are fluffy, cheesy, and oh-so-satisfying. Trust me, once you try them, they’ll become a staple in your home, bringing smiles to your family’s faces with every bite!
Why You’ll Love This Gluten Free Roasted Garlic Cheddar Dinner Rolls
These Gluten Free Roasted Garlic Cheddar Dinner Rolls are a game-changer for busy families. They come together in just 40 minutes, making them perfect for last-minute dinners or gatherings. The combination of roasted garlic and cheddar creates a flavor explosion that even picky eaters will love. Plus, they’re gluten-free, so everyone can enjoy them without worry. Trust me, these rolls will quickly become a favorite at your table!
Ingredients for Gluten Free Roasted Garlic Cheddar Dinner Rolls
Gathering the right ingredients is the first step to creating these delightful rolls. Here’s what you’ll need:
- Gluten-free all-purpose flour: This is the base of our rolls. It gives them structure without the gluten. Look for a blend that includes xanthan gum for the best results.
- Shredded cheddar cheese: The star of the show! It adds a rich, cheesy flavor that pairs perfectly with roasted garlic. Feel free to use sharp or mild cheddar based on your preference.
- Roasted garlic: This ingredient brings a sweet, mellow flavor to the rolls. You can roast your own or buy pre-roasted garlic for convenience.
- Baking powder: This is our leavening agent, helping the rolls rise and become fluffy. Make sure it’s fresh for the best results.
- Salt: A little salt enhances all the flavors in the rolls. It’s a must-have in any bread recipe!
- Unsalted butter: Melted butter adds richness and moisture to the dough. If you prefer a dairy-free option, you can substitute with coconut oil or a dairy-free butter alternative.
- Milk: This adds moisture to the dough. You can use regular milk or a dairy-free alternative like almond or oat milk.
- Eggs: Eggs help bind the ingredients together and add a lovely texture. If you’re looking for an egg-free option, try using flax eggs instead.
For exact measurements, check the bottom of the article where you can find everything you need for printing. Happy cooking!
How to Make Gluten Free Roasted Garlic Cheddar Dinner Rolls
Making these Gluten Free Roasted Garlic Cheddar Dinner Rolls is a breeze! Follow these simple steps, and you’ll have fluffy, cheesy rolls ready to impress your family. Let’s dive in!
Step 1: Preheat the Oven
First things first, preheat your oven to 375°F (190°C). Preheating is crucial because it ensures even baking. If you skip this step, your rolls might end up unevenly cooked. Trust me, you want that golden-brown crust!
Step 2: Combine Dry Ingredients
In a large bowl, mix together the gluten-free all-purpose flour, baking powder, and salt. Use a whisk to combine them well. This step is essential for distributing the baking powder evenly, which helps your rolls rise beautifully. No lumps allowed!
Step 3: Add Wet Ingredients
Now, it’s time to bring in the flavor! Add the roasted garlic, shredded cheddar cheese, melted butter, milk, and eggs to the dry mixture. Stir everything together until well combined. The dough should be slightly sticky but manageable. If it feels too dry, add a splash more milk!
Step 4: Form the Dough
Once everything is mixed, it’s time to form the dough. Use your hands or a spatula to mix until a cohesive dough forms. It should be soft and a bit tacky, but not overly sticky. If it sticks to your fingers too much, sprinkle a little more gluten-free flour.
Step 5: Shape the Rolls
Now comes the fun part! Take small portions of dough and roll them into balls, about the size of a golf ball. Place them on a baking sheet lined with parchment paper, leaving some space between each roll. They’ll puff up while baking, so give them room to grow!
Step 6: Bake the Rolls
Pop the baking sheet into your preheated oven and bake for 20-25 minutes. Keep an eye on them! You’ll know they’re done when they turn golden brown on top. A toothpick inserted in the center should come out clean. If it’s gooey, give them a few more minutes.
Step 7: Cool and Serve
Once baked, remove the rolls from the oven and let them cool slightly on a wire rack. This step is important because it allows the steam to escape, preventing sogginess. Serve them warm, and watch your family devour these delicious rolls!
Tips for Success
- Always measure your gluten-free flour accurately for the best texture.
- Let your roasted garlic cool before adding it to the dough for easier mixing.
- For extra fluffiness, ensure your baking powder is fresh.
- Don’t skip the cooling step; it helps maintain the rolls’ structure.
- Experiment with herbs like rosemary for a unique twist!
Equipment Needed
- Mixing bowl: A large bowl for combining ingredients. A sturdy glass or ceramic bowl works well.
- Whisk: Perfect for mixing dry ingredients. A fork can also do the trick!
- Baking sheet: Use a standard baking sheet lined with parchment paper. A silicone mat is a great alternative.
- Measuring cups and spoons: Essential for accurate ingredient measurements. A kitchen scale can be handy too!
- Wire rack: Ideal for cooling the rolls. If you don’t have one, a plate will suffice.
Variations
- Herb-Infused Rolls: Add fresh herbs like rosemary, thyme, or parsley to the dough for an aromatic twist.
- Spicy Kick: Mix in some diced jalapeños or red pepper flakes for a spicy version that packs a punch!
- Cheese Lovers: Experiment with different cheeses like pepper jack or gouda for a unique flavor profile.
- Vegan Option: Substitute eggs with flax eggs and use a dairy-free butter alternative to make these rolls vegan-friendly.
- Sweet Variation: For a sweeter roll, add a tablespoon of honey or maple syrup and a pinch of cinnamon to the dough.
Serving Suggestions
- Pair these rolls with a warm bowl of soup, like tomato basil or creamy potato.
- Serve alongside a fresh garden salad drizzled with vinaigrette for a light meal.
- For a cozy dinner, enjoy them with roasted meats or grilled vegetables.
- Present them in a rustic basket lined with a cloth for a charming touch.
- Don’t forget to offer a side of herb-infused butter for extra indulgence!
FAQs about Gluten Free Roasted Garlic Cheddar Dinner Rolls
Can I make these rolls ahead of time?
Absolutely! You can prepare the dough and shape the rolls, then refrigerate them for up to 24 hours before baking. Just let them sit at room temperature for about 30 minutes before popping them in the oven.
What can I substitute for gluten-free flour?
If you don’t have gluten-free all-purpose flour, you can try a homemade blend of almond flour and tapioca starch. Just keep in mind that the texture may vary slightly.
How do I store leftover rolls?
Store any leftover Gluten Free Roasted Garlic Cheddar Dinner Rolls in an airtight container at room temperature for up to three days. You can also freeze them for longer storage. Just thaw and reheat when you’re ready to enjoy!
Can I use different types of cheese?
Definitely! Feel free to experiment with different cheeses like mozzarella, gouda, or even a spicy pepper jack. Each will bring its own unique flavor to the rolls!
What can I serve these rolls with?
These rolls pair wonderfully with soups, salads, or roasted meats. They also make a great addition to any holiday meal or family gathering!
Summarizing the Joy of Gluten Free Roasted Garlic Cheddar Dinner Rolls
There’s something truly magical about pulling a batch of Gluten Free Roasted Garlic Cheddar Dinner Rolls from the oven. The warm, cheesy aroma fills the air, instantly lifting spirits and creating a cozy atmosphere. Each fluffy bite is a delightful blend of savory garlic and rich cheddar, making them irresistible. Whether you’re sharing them at a family dinner or enjoying them solo with a cup of soup, these rolls bring comfort and joy. They’re not just food; they’re a warm hug on a plate, reminding us that even on busy days, we can create something special in our kitchens.
PrintGluten Free Roasted Garlic Cheddar Dinner Rolls are a must-try!
Deliciously fluffy and cheesy, these gluten-free roasted garlic cheddar dinner rolls are perfect for any meal.
- Prep Time: 15 minutes
- Cook Time: 25 minutes
- Total Time: 40 minutes
- Yield: 12 rolls 1x
- Category: Bread
- Method: Baking
- Cuisine: American
- Diet: Gluten Free
Ingredients
- 2 cups gluten-free all-purpose flour
- 1 cup shredded cheddar cheese
- 1 head of garlic, roasted
- 1 tablespoon baking powder
- 1 teaspoon salt
- 1/4 cup unsalted butter, melted
- 1 cup milk (or dairy-free alternative)
- 2 large eggs
Instructions
- Preheat the oven to 375°F (190°C).
- In a large bowl, combine the gluten-free flour, baking powder, and salt.
- Add the roasted garlic, shredded cheddar cheese, melted butter, milk, and eggs to the dry ingredients.
- Mix until a dough forms.
- Shape the dough into small balls and place them on a baking sheet lined with parchment paper.
- Bake for 20-25 minutes or until golden brown.
- Let cool slightly before serving.
Notes
- For extra flavor, add herbs like rosemary or thyme.
- These rolls are best served warm.
- Store leftovers in an airtight container for up to 3 days.
Nutrition
- Serving Size: 1 roll
- Calories: 150
- Sugar: 1g
- Sodium: 200mg
- Fat: 8g
- Saturated Fat: 5g
- Unsaturated Fat: 2g
- Trans Fat: 0g
- Carbohydrates: 15g
- Fiber: 1g
- Protein: 5g
- Cholesterol: 40mg