
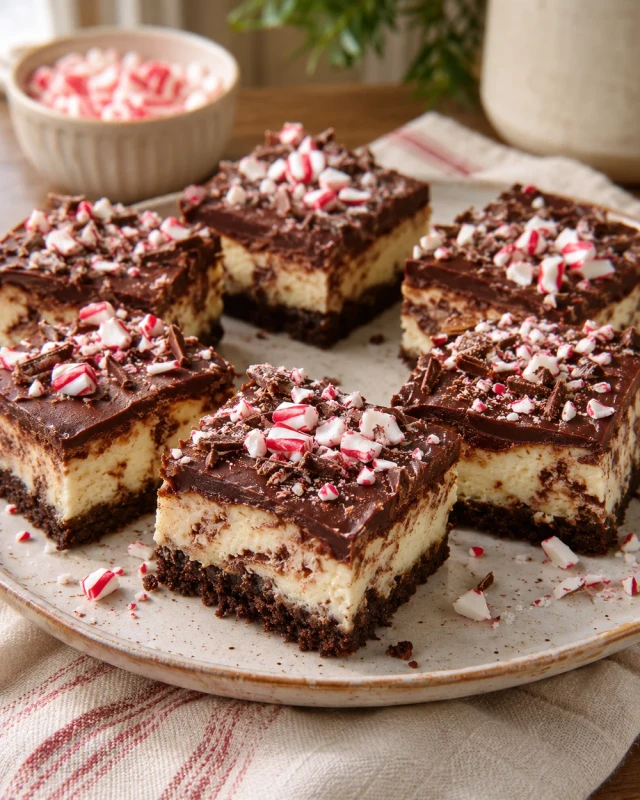
Gluten Free Chocolate Peppermint Cheesecake Bars
As the holiday season approaches, I find myself craving something sweet yet festive. That’s where these Gluten Free Chocolate Peppermint Cheesecake Bars come in! They’re not just a treat; they’re a delightful way to bring joy to your family gatherings. With their rich, creamy texture and a hint of peppermint, these bars are perfect for busy moms like us who want to impress without spending hours in the kitchen. Plus, they’re gluten-free, making them a hit for everyone at the table. Trust me, these bars will become a cherished holiday tradition!
Why You’ll Love This Gluten Free Chocolate Peppermint Cheesecake Bars
These Gluten Free Chocolate Peppermint Cheesecake Bars are a dream come true for busy moms and professionals. They’re quick to whip up, taking just under an hour of your time, and the taste? Absolutely divine! The creamy cheesecake paired with the refreshing peppermint flavor creates a festive treat that everyone will adore. Plus, they’re perfect for sharing at holiday gatherings, making you the star of the dessert table!
Ingredients for Gluten Free Chocolate Peppermint Cheesecake Bars
Gathering the right ingredients is the first step to creating these delightful Gluten Free Chocolate Peppermint Cheesecake Bars. Here’s what you’ll need:
- Gluten-free chocolate cookie crumbs: These form the base of your bars, providing a rich chocolate flavor. You can use store-bought or crush your favorite gluten-free cookies.
- Unsalted butter: Melted butter binds the crumbs together, creating a deliciously firm crust. Unsalted is best to control the saltiness.
- Cream cheese: The star of the show! Softened cream cheese gives these bars their creamy texture. Make sure it’s at room temperature for easy mixing.
- Powdered sugar: This sweetener adds just the right amount of sweetness without the graininess of granulated sugar. It blends beautifully into the cheesecake filling.
- Peppermint extract: A splash of this extract brings that festive flavor to life. Adjust the amount based on your peppermint preference!
- Large eggs: Eggs help bind the filling and give it a smooth, rich consistency. Adding them one at a time ensures a well-mixed batter.
- Semi-sweet chocolate chips: These little morsels add bursts of chocolatey goodness throughout the bars. You can swap them for dark chocolate if you prefer.
- Crushed peppermint candies: These not only enhance the peppermint flavor but also add a delightful crunch. You can use candy canes or store-bought peppermint candies.
For exact measurements, check the bottom of the article where you can find everything listed for easy printing. Happy baking!
How to Make Gluten Free Chocolate Peppermint Cheesecake Bars
Now that you have all your ingredients ready, let’s dive into the fun part—making these Gluten Free Chocolate Peppermint Cheesecake Bars! Follow these simple steps, and you’ll have a delicious dessert that will wow your family and friends.
Step 1: Preheat the Oven
First things first, preheat your oven to 350°F (175°C). Preheating is crucial because it ensures even baking. If you skip this step, your bars might not set properly, and nobody wants a gooey mess!
Step 2: Prepare the Crust
In a mixing bowl, combine the gluten-free chocolate cookie crumbs with the melted butter. Stir until everything is well mixed. The mixture should resemble wet sand. Now, press it firmly into the bottom of a greased 9×9 inch baking pan. This step is vital; a well-pressed crust holds the bars together beautifully!
Step 3: Make the Cheesecake Filling
In a large mixing bowl, beat the softened cream cheese until it’s smooth and creamy. Add the powdered sugar and peppermint extract, mixing until everything is well combined. The texture should be velvety and luscious—this is what makes your cheesecake filling so irresistible!
Step 4: Add Eggs and Mix
Now, it’s time to add the eggs. Crack them in one at a time, mixing well after each addition. This method ensures a smooth mixture without lumps. Trust me, a little patience here goes a long way in achieving that perfect creamy texture!
Step 5: Fold in Chocolate and Peppermint
Gently fold in the semi-sweet chocolate chips and crushed peppermint candies. Use a spatula to incorporate them without overmixing. You want those delightful bursts of chocolate and peppermint throughout your bars, not a blended mess!
Step 6: Bake the Bars
Pour the cheesecake mixture over your prepared crust in the baking pan. Bake for 30-35 minutes, or until the center is set. To check for doneness, gently shake the pan; if the center jiggles slightly, it’s ready. Let it cool in the pan for about 10 minutes before transferring it to a wire rack.
Step 7: Chill and Slice
Once cooled, refrigerate the bars for at least 4 hours. Chilling is essential for the best texture. When you’re ready to slice, use a sharp knife for clean cuts. Enjoy the anticipation as you reveal those beautiful layers of chocolate and peppermint!
Tips for Success
- Make sure your cream cheese is at room temperature for easy mixing.
- Press the crust firmly to avoid crumbling when slicing.
- For a stronger peppermint flavor, feel free to increase the peppermint extract.
- Use a sharp knife to slice the bars for clean edges.
- Let the bars chill overnight for the best flavor and texture.
Equipment Needed
- 9×9 inch baking pan: A square pan is ideal, but you can use an 8×8 inch pan if that’s what you have.
- Mixing bowls: Use medium and large bowls for mixing ingredients; any size will do!
- Electric mixer: A hand mixer works great, but a whisk can do the job too.
- Spatula: Essential for folding in ingredients and scraping the bowl clean.
- Wire rack: Perfect for cooling your bars, but a plate will work in a pinch.
Variations
- Nutty Delight: Add chopped walnuts or pecans to the crust for a crunchy texture.
- Chocolate Mint Swirl: Swirl in some melted dark chocolate into the cheesecake filling for an extra chocolatey kick.
- Vegan Option: Substitute cream cheese with a vegan cream cheese alternative and use flax eggs instead of regular eggs.
- Different Extracts: Experiment with almond or vanilla extract for a unique flavor twist.
- Fruit Topping: Top the bars with fresh raspberries or strawberries for a fruity contrast to the chocolate and peppermint.
Serving Suggestions
- Pair these bars with a dollop of whipped cream for an extra touch of indulgence.
- Serve alongside a warm cup of hot cocoa or peppermint tea for a cozy treat.
- For a festive presentation, sprinkle crushed peppermint candies on top before serving.
- Consider adding a scoop of vanilla ice cream for a delightful contrast.
FAQs about Gluten Free Chocolate Peppermint Cheesecake Bars
Can I make these bars ahead of time?
Absolutely! These Gluten Free Chocolate Peppermint Cheesecake Bars can be made a day or two in advance. Just store them in an airtight container in the refrigerator. They actually taste even better after chilling overnight!
What can I use instead of gluten-free chocolate cookie crumbs?
If you can’t find gluten-free chocolate cookie crumbs, you can crush gluten-free graham crackers or even use almond flour mixed with cocoa powder. Just make sure whatever you choose is gluten-free!
How do I store leftovers?
Store any leftover bars in an airtight container in the refrigerator for up to five days. You can also freeze them for up to three months. Just thaw them in the fridge before serving!
Can I substitute the cream cheese?
Yes! If you’re looking for a dairy-free option, try using a vegan cream cheese alternative. Just ensure it’s gluten-free to keep the bars suitable for everyone.
What’s the best way to slice these bars?
For clean slices, use a sharp knife and wipe it clean between cuts. This helps maintain those beautiful layers of chocolate and peppermint without any messy edges!
Summarizing the Joy of Gluten Free Chocolate Peppermint Cheesecake Bars
There’s something magical about sharing these Gluten Free Chocolate Peppermint Cheesecake Bars with loved ones. The rich, creamy texture combined with the refreshing peppermint creates a symphony of flavors that dances on your palate. Each bite is a reminder of the joy of baking and the warmth of family gatherings. Whether it’s a holiday celebration or a cozy night in, these bars bring smiles and sweet memories. So, roll up your sleeves, embrace the holiday spirit, and let these delightful treats become a cherished part of your family traditions. Happy baking!
PrintGluten Free Chocolate Peppermint Cheesecake Bars Delight!
Deliciously rich and creamy gluten-free chocolate peppermint cheesecake bars, perfect for the holiday season.
- Prep Time: 20 minutes
- Cook Time: 35 minutes
- Total Time: 4 hours 55 minutes
- Yield: 16 bars 1x
- Category: Dessert
- Method: Baking
- Cuisine: American
- Diet: Gluten Free
Ingredients
- 1 ½ cups gluten-free chocolate cookie crumbs
- ½ cup unsalted butter, melted
- 2 cups cream cheese, softened
- 1 cup powdered sugar
- 1 teaspoon peppermint extract
- 2 large eggs
- 1 cup semi-sweet chocolate chips
- ¼ cup crushed peppermint candies
Instructions
- Preheat the oven to 350°F (175°C).
- In a bowl, mix the gluten-free chocolate cookie crumbs with melted butter until combined.
- Press the mixture into the bottom of a greased 9×9 inch baking pan.
- In a large mixing bowl, beat the cream cheese until smooth.
- Add the powdered sugar and peppermint extract, mixing until well combined.
- Beat in the eggs one at a time until fully incorporated.
- Fold in the chocolate chips and crushed peppermint candies.
- Pour the cheesecake mixture over the crust in the baking pan.
- Bake for 30-35 minutes or until the center is set.
- Allow to cool, then refrigerate for at least 4 hours before slicing.
Notes
- For a stronger peppermint flavor, increase the peppermint extract to 1 ½ teaspoons.
- Store leftovers in an airtight container in the refrigerator for up to 5 days.
- These bars can be frozen for up to 3 months; thaw in the refrigerator before serving.
Nutrition
- Serving Size: 1 bar
- Calories: 250
- Sugar: 18g
- Sodium: 150mg
- Fat: 15g
- Saturated Fat: 9g
- Unsaturated Fat: 4g
- Trans Fat: 0g
- Carbohydrates: 28g
- Fiber: 1g
- Protein: 3g
- Cholesterol: 50mg