
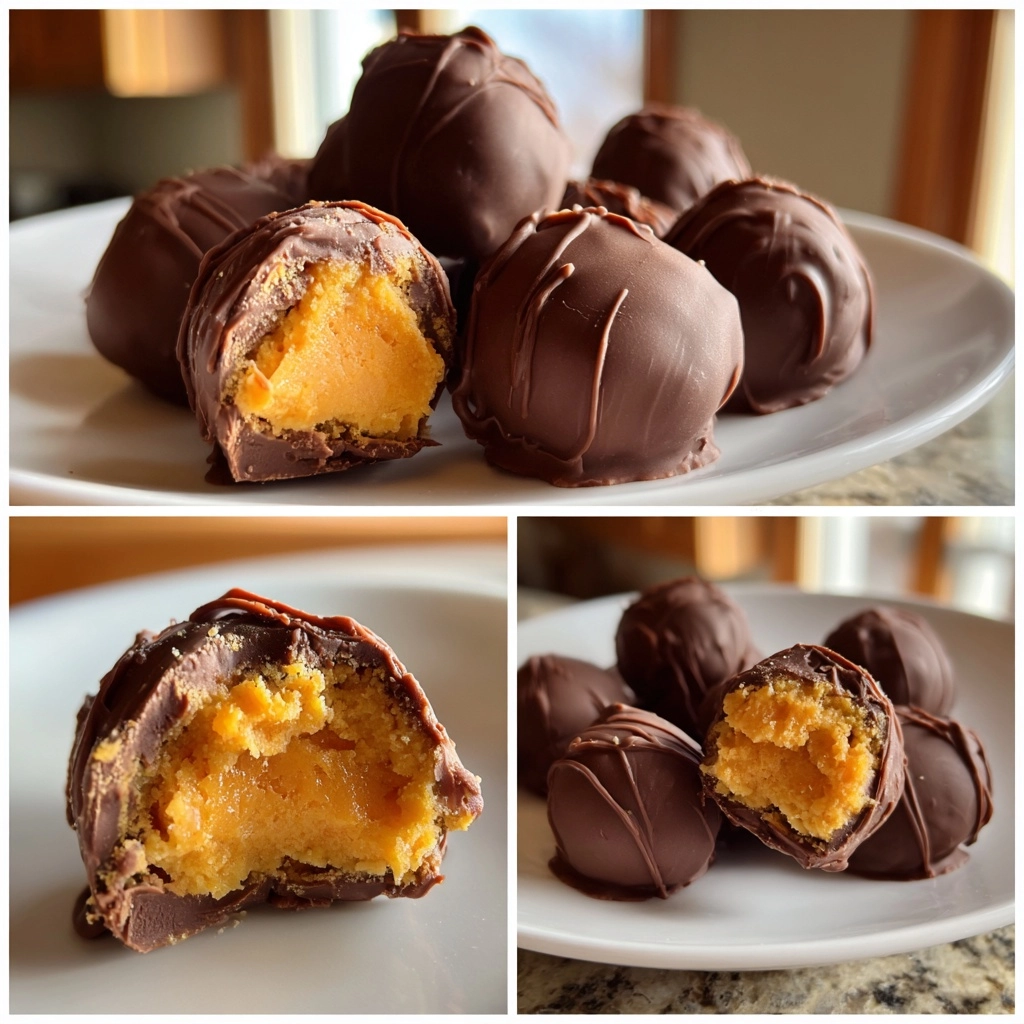
Introduction to Pumpkin Cheesecake Truffles
As the leaves turn and the air gets crisp, I find myself craving the warm, cozy flavors of fall. That’s where these delightful Pumpkin Cheesecake Truffles come in! They’re the perfect little bites of joy that can brighten up any busy day. Whether you’re looking to impress guests at a gathering or simply treat yourself after a long week, these truffles are a quick and easy solution. With just a few ingredients and no baking required, you can whip up a batch that will have everyone asking for seconds. Trust me, they’re a must-try this season!
Why You’ll Love This Pumpkin Cheesecake Truffles
These Pumpkin Cheesecake Truffles are a dream come true for busy moms and professionals alike. They come together in just 20 minutes, making them a fantastic last-minute treat. The creamy pumpkin filling wrapped in rich chocolate is a flavor combination that’s hard to resist. Plus, they’re no-bake, so you can skip the oven and still impress your loved ones with a delightful dessert. What’s not to love?
Ingredients for Pumpkin Cheesecake Truffles
Gathering the right ingredients is the first step to creating these scrumptious Pumpkin Cheesecake Truffles. Here’s what you’ll need:
- Cream Cheese: This is the base of our truffles, providing a rich and creamy texture. Make sure it’s softened for easy mixing.
- Pumpkin Puree: The star of the show! It adds that lovely fall flavor and a beautiful orange hue. Use canned puree for convenience or make your own from fresh pumpkins.
- Powdered Sugar: This sweetens the mixture and gives it a smooth finish. It dissolves easily, making it perfect for no-bake recipes.
- Vanilla Extract: A splash of vanilla enhances the overall flavor, adding warmth and depth to the truffles.
- Pumpkin Pie Spice: This blend of spices—think cinnamon, nutmeg, and ginger—brings that cozy fall aroma to your truffles. You can also make your own mix if you prefer.
- Chocolate Chips: These are for coating the truffles. Dark, milk, or even white chocolate can be used, depending on your taste.
- Coconut Oil: This helps the chocolate melt smoothly and gives it a nice sheen. You can substitute with vegetable oil if you prefer.
For exact measurements, check the bottom of the article where you can find everything listed for easy printing. Happy cooking!
How to Make Pumpkin Cheesecake Truffles
Now that you have all your ingredients ready, let’s dive into the fun part—making these delightful Pumpkin Cheesecake Truffles! Follow these simple steps, and you’ll have a batch of sweet treats in no time.
Step 1: Prepare the Mixture
Start by grabbing a mixing bowl. Combine the softened cream cheese, pumpkin puree, powdered sugar, vanilla extract, and pumpkin pie spice. Use a hand mixer or a spatula to blend everything until it’s smooth and creamy. The mixture should be thick but spreadable, like a luscious frosting. Trust me, the aroma will make your kitchen feel like fall!
Step 2: Chill the Mixture
Once your mixture is ready, it’s time to chill! Cover the bowl with plastic wrap and pop it in the refrigerator for about 30 minutes. This step is crucial as it helps firm up the mixture, making it easier to roll into truffles. While you wait, you can sip on a warm cup of cider or plan your next family gathering!
Step 3: Form the Truffles
After chilling, take the mixture out of the fridge. Now comes the fun part! Scoop out small portions of the mixture—about a tablespoon each—and roll them into balls using your hands. Don’t worry if they’re not perfect; a little rustic charm adds character. Place the rolled truffles on a baking sheet lined with parchment paper.
Step 4: Freeze the Truffles
To help the truffles hold their shape, place the baking sheet in the freezer for about 15 minutes. This quick freeze will make dipping them in chocolate a breeze. While you wait, you can daydream about how delicious they’ll be!
Step 5: Melt the Chocolate
Now, let’s get to the chocolate! In a microwave-safe bowl, combine the chocolate chips and coconut oil. Microwave in 30-second intervals, stirring in between, until the mixture is smooth and glossy. The coconut oil will give your chocolate a beautiful sheen, making your truffles look extra tempting.
Step 6: Coat the Truffles
Once your chocolate is melted, it’s time to dip! Take each truffle from the freezer and carefully dip it into the melted chocolate. Use a fork to lift it out, allowing any excess chocolate to drip off. Make sure each truffle is fully coated for that rich chocolatey goodness. Place them back on the parchment-lined baking sheet.
Step 7: Set the Truffles
Finally, return the coated truffles to the refrigerator. Let them set until the chocolate hardens, which usually takes about 30 minutes. Once they’re ready, you can sprinkle some crushed graham crackers on top for a festive touch. Now, you’re all set to enjoy these delightful Pumpkin Cheesecake Truffles!
Tips for Success
- Make sure your cream cheese is at room temperature for easy mixing.
- Use a cookie scoop for uniform truffle sizes; it makes rolling easier!
- Chill the truffles longer if they’re too soft to handle.
- Experiment with different chocolate types for unique flavors.
- Don’t skip the graham cracker topping; it adds a delightful crunch!
Equipment Needed
- Mixing Bowl: A medium-sized bowl works best. You can also use a stand mixer if you have one.
- Spatula or Hand Mixer: A spatula is great for mixing, but a hand mixer makes it quicker.
- Baking Sheet: Any flat baking sheet will do; just line it with parchment paper.
- Microwave-Safe Bowl: For melting chocolate, any microwave-safe bowl will work.
- Cookie Scoop: This is optional but helps in making uniform truffles.
Variations of Pumpkin Cheesecake Truffles
- Nutty Delight: Add chopped pecans or walnuts to the mixture for a crunchy texture and nutty flavor.
- Spiced Up: Increase the pumpkin pie spice for a bolder flavor or add a pinch of cayenne for a surprising kick.
- Chocolate Lovers: Use dark chocolate for coating to enhance the richness and balance the sweetness of the truffles.
- Vegan Option: Substitute cream cheese with a vegan cream cheese alternative and use dairy-free chocolate chips.
- Caramel Drizzle: Drizzle melted caramel over the set truffles for an extra layer of sweetness and a beautiful presentation.
Serving Suggestions for Pumpkin Cheesecake Truffles
- Pair with a warm cup of spiced chai or apple cider for a cozy treat.
- Serve on a festive platter, garnished with fall leaves or mini pumpkins for a seasonal touch.
- Offer alongside a scoop of vanilla ice cream for a delightful dessert duo.
- Dust with cocoa powder or crushed graham crackers for an elegant finish.
FAQs about Pumpkin Cheesecake Truffles
Can I make Pumpkin Cheesecake Truffles ahead of time?
Absolutely! These truffles can be made a few days in advance. Just store them in an airtight container in the refrigerator. They’ll stay fresh and delicious, making them perfect for busy schedules.
What can I use instead of cream cheese?
If you’re looking for a dairy-free option, try using a vegan cream cheese alternative. It works beautifully in this recipe and keeps the creamy texture intact.
How do I store leftover truffles?
Store any leftover Pumpkin Cheesecake Truffles in an airtight container in the refrigerator. They’ll last up to a week, but I doubt they’ll last that long!
Can I freeze these truffles?
Yes, you can freeze them! Just place the truffles in a single layer on a baking sheet until frozen, then transfer them to a freezer-safe container. They’ll keep for up to three months.
What’s the best way to serve these truffles?
Serve them chilled for the best flavor and texture. Pair them with a warm drink or present them on a festive platter for a delightful fall treat!
Final Thoughts
Creating these Pumpkin Cheesecake Truffles is more than just making a dessert; it’s about embracing the warmth of fall and sharing joy with loved ones. Each bite is a delightful blend of creamy pumpkin and rich chocolate, evoking memories of cozy gatherings and laughter. Whether you’re treating yourself or impressing guests, these truffles are sure to bring smiles all around. Plus, the simplicity of the recipe means you can whip them up even on the busiest days. So, gather your ingredients and let the sweet aroma fill your kitchen—happiness is just a truffle away!
PrintPumpkin Cheesecake Truffles: Indulge in This Fall Delight!
Delicious pumpkin cheesecake truffles coated in chocolate, perfect for fall celebrations.
- Prep Time: 20 minutes
- Cook Time: 0 minutes
- Total Time: 50 minutes
- Yield: 24 truffles 1x
- Category: Dessert
- Method: No-bake
- Cuisine: American
- Diet: Vegetarian
Ingredients
- 8 oz cream cheese, softened
- 1 cup pumpkin puree
- 1 cup powdered sugar
- 1 tsp vanilla extract
- 1 tsp pumpkin pie spice
- 2 cups chocolate chips
- 1 tbsp coconut oil
Instructions
- In a mixing bowl, combine softened cream cheese, pumpkin puree, powdered sugar, vanilla extract, and pumpkin pie spice until smooth.
- Chill the mixture in the refrigerator for about 30 minutes.
- Once chilled, scoop out small portions and roll them into balls.
- Place the truffles on a baking sheet lined with parchment paper and freeze for 15 minutes.
- In a microwave-safe bowl, melt chocolate chips and coconut oil together until smooth.
- Dip each truffle into the melted chocolate, ensuring they are fully coated.
- Return the coated truffles to the baking sheet and let them set in the refrigerator until the chocolate hardens.
Notes
- For a festive touch, sprinkle some crushed graham crackers on top before the chocolate sets.
- Store truffles in an airtight container in the refrigerator for up to a week.
Nutrition
- Serving Size: 1 truffle
- Calories: 120
- Sugar: 10g
- Sodium: 50mg
- Fat: 7g
- Saturated Fat: 4g
- Unsaturated Fat: 2g
- Trans Fat: 0g
- Carbohydrates: 14g
- Fiber: 1g
- Protein: 2g
- Cholesterol: 15mg