
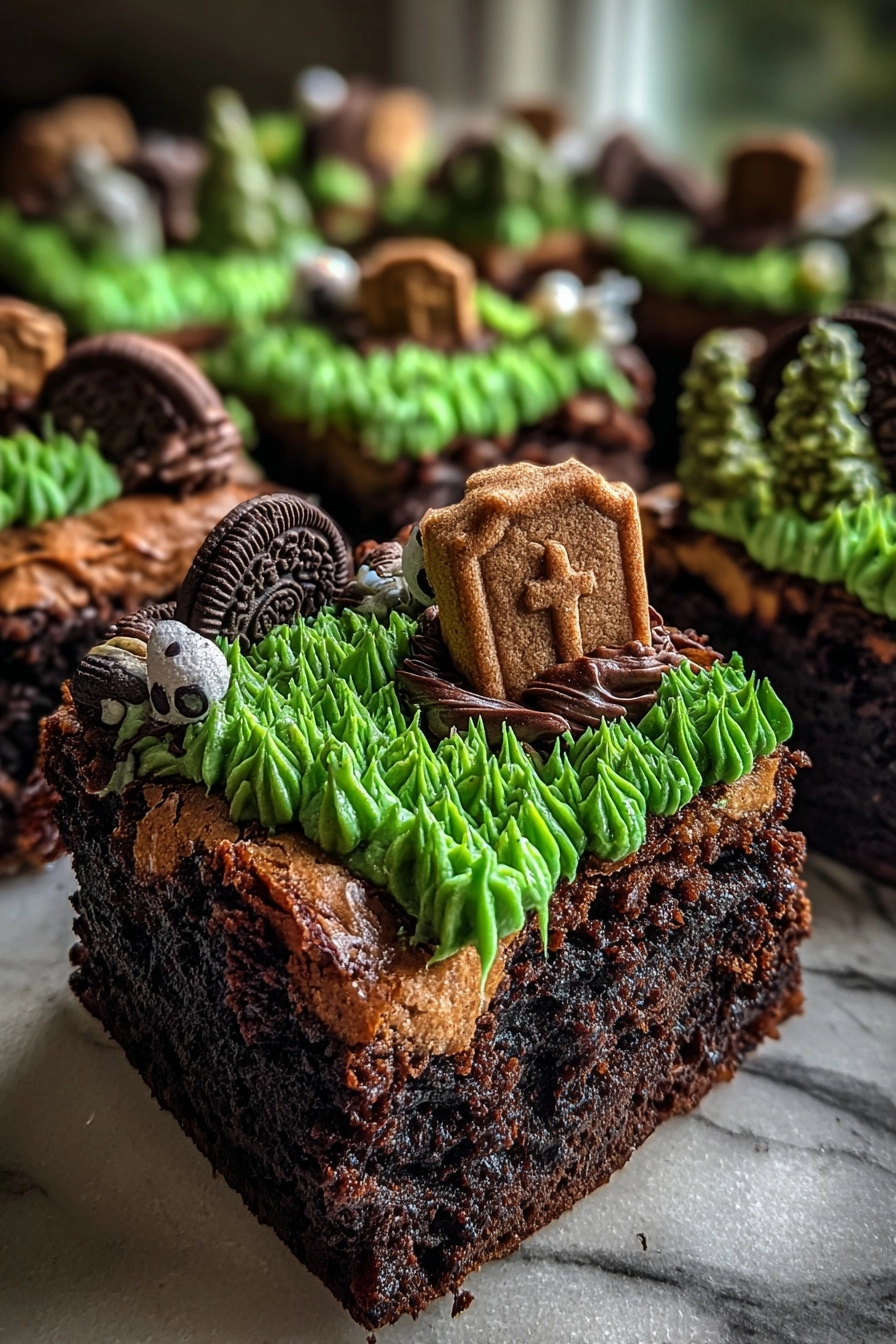
Introduction to Zombie Graveyard Brownies
As the leaves turn and the air gets crisp, I find myself craving something sweet and a little spooky. That’s where my Zombie Graveyard Brownies come in! These delightful treats are not just a quick solution for a busy day; they’re a fun way to impress your loved ones at Halloween gatherings. With their rich chocolatey goodness and playful decorations, they’re sure to be a hit with kids and adults alike. Plus, they’re easy to whip up, making them perfect for those of us juggling a million things at once!
Why You’ll Love This Zombie Graveyard Brownies
These Zombie Graveyard Brownies are a delightful blend of ease and taste. They come together quickly, making them perfect for busy moms like me who need a sweet treat without the fuss. The rich chocolate flavor is irresistible, and the spooky decorations add a fun twist that kids adore. Plus, they’re a fantastic way to get everyone involved in the kitchen, creating memories while baking together!
Ingredients for Zombie Graveyard Brownies
Gathering the right ingredients is half the fun of baking! For these Zombie Graveyard Brownies, you’ll need a mix of pantry staples and a few fun decorations to bring your spooky vision to life.
- Unsalted butter: This adds richness and moisture to the brownies, making them fudgy and delicious.
- Granulated sugar: Sweetness is key! It helps create that perfect chewy texture.
- Large eggs: Eggs bind everything together and give the brownies their structure.
- Vanilla extract: A splash of vanilla enhances the chocolate flavor, making it even more irresistible.
- All-purpose flour: This is the base of your brownies, providing the necessary structure.
- Cocoa powder: The star of the show! It gives the brownies their rich chocolate flavor.
- Salt: Just a pinch balances the sweetness and enhances the overall flavor.
- Baking powder: This helps the brownies rise slightly, giving them a nice texture.
- Chocolate cookies: These will serve as gravestones, adding a fun and spooky touch to your dessert.
- Green frosting: Use this to create grass around your graveyard, making it look extra festive.
- Gummy worms: These creepy crawlers are perfect for adding a playful element to your graveyard scene.
- Edible eyes: These little guys will give your brownies a fun, spooky character!
For exact measurements, check the bottom of the article where you can find everything listed for easy printing. Feel free to get creative with your decorations based on your Halloween theme!
How to Make Zombie Graveyard Brownies
Now that we have our ingredients ready, let’s dive into the fun part—making these Zombie Graveyard Brownies! Follow these simple steps, and you’ll have a spooky treat that’s sure to impress. Trust me, the process is as enjoyable as the end result!
Step 1: Preheat and Prepare
First things first, preheat your oven to 350°F (175°C). This ensures your brownies bake evenly. While that’s heating up, grease a 9×13 inch baking pan. I like to use butter for greasing, but cooking spray works just as well!
Step 2: Mix the Wet Ingredients
In a large bowl, melt the unsalted butter. I usually do this in the microwave for about 30 seconds. Once melted, mix in the granulated sugar until it’s well combined. Next, add the eggs one at a time, mixing thoroughly after each addition. Don’t forget to stir in the vanilla extract for that extra flavor boost!
Step 3: Combine the Dry Ingredients
In another bowl, whisk together the all-purpose flour, cocoa powder, salt, and baking powder. This step is crucial as it helps to evenly distribute the dry ingredients. Plus, it makes sure your brownies rise perfectly, giving them that delightful texture!
Step 4: Combine Wet and Dry Mixtures
Now, it’s time to bring it all together! Gradually add the dry mixture to the wet ingredients. Mix gently until just combined. Be careful not to overmix; we want our brownies to stay fudgy and moist!
Step 5: Bake the Brownies
Pour the brownie batter into your prepared baking pan, spreading it evenly. Pop it into the preheated oven and bake for 25-30 minutes. To check for doneness, insert a toothpick in the center. If it comes out clean, your brownies are ready!
Step 6: Cool and Decorate
Once baked, let the brownies cool completely in the pan. This is the hardest part, but trust me, it’s worth the wait! After they’ve cooled, it’s time to unleash your creativity. Use green frosting to create grass, place chocolate cookies as gravestones, and add gummy worms and edible eyes for that spooky touch!
Tips for Success
- Make sure your butter is fully melted for a smooth batter.
- Don’t overmix the batter; it should be just combined for fudgy brownies.
- Let the brownies cool completely before decorating to avoid a melty mess.
- Get creative with decorations—use different candies to match your Halloween theme!
- Store leftovers in an airtight container to keep them fresh and delicious.
Equipment Needed
- 9×13 inch baking pan: A standard size for brownies; a glass or metal pan works well.
- Mixing bowls: Use a large bowl for wet ingredients and a medium bowl for dry.
- Whisk: Perfect for combining dry ingredients; a fork can work in a pinch.
- Spatula: Great for spreading the batter evenly in the pan.
- Toothpick: Essential for checking if your brownies are baked to perfection!
Variations
- Nutty Delight: Add chopped walnuts or pecans to the brownie batter for a crunchy texture and nutty flavor.
- Gluten-Free Option: Substitute all-purpose flour with a gluten-free flour blend to make these brownies suitable for gluten-sensitive friends.
- Minty Twist: Incorporate mint extract into the batter for a refreshing mint chocolate flavor that pairs perfectly with Halloween.
- Vegan Version: Replace eggs with flaxseed meal mixed with water and use a plant-based butter alternative for a vegan-friendly treat.
- Spicy Kick: Add a pinch of cayenne pepper or cinnamon to the batter for a surprising and delightful flavor twist!
Serving Suggestions
- Pair your Zombie Graveyard Brownies with a scoop of vanilla ice cream for a delightful contrast.
- Serve with a spooky punch or hot apple cider to enhance the Halloween vibe.
- For a fun presentation, place the brownies on a decorative platter surrounded by fake spider webs.
- Consider adding a sprinkle of powdered sugar for a ghostly effect!
FAQs about Zombie Graveyard Brownies
As I’ve shared my Zombie Graveyard Brownies with friends and family, I’ve noticed a few common questions pop up. Here are some answers to help you navigate your spooky baking adventure!
Can I make these brownies ahead of time?
Absolutely! These brownies can be made a day in advance. Just store them in an airtight container to keep them fresh. This way, you can focus on other Halloween preparations!
What if I don’t have green frosting?
No worries! You can easily make your own green frosting by mixing white frosting with green food coloring. Alternatively, use crushed green candies or even green sprinkles for a fun twist!
Can I use different decorations?
How do I store leftover brownies?
Store any leftover brownies in an airtight container at room temperature. They’ll stay delicious for up to a week. If you want to keep them longer, you can freeze them for up to three months!
Are these brownies suitable for kids?
Yes! These Zombie Graveyard Brownies are a hit with kids. The fun decorations and rich chocolate flavor make them a perfect treat for Halloween parties or school events!
Final Thoughts
Creating these Zombie Graveyard Brownies is more than just baking; it’s about making memories with your loved ones. The laughter, the creativity, and the joy of decorating together bring a special warmth to the kitchen. As you watch your family’s eyes light up at the spooky treats, you’ll realize that these brownies are not just a dessert; they’re a celebration of the season. So, gather your ingredients, unleash your inner artist, and enjoy the deliciously haunting experience of making these brownies. Trust me, they’ll haunt your taste buds long after the last crumb is gone!
PrintZombie Graveyard Brownies That Will Haunt Your Tastebuds!

Deliciously spooky brownies decorated to resemble a graveyard, perfect for Halloween parties.
- Prep Time: 20 minutes
- Cook Time: 30 minutes
- Total Time: 50 minutes
- Yield: 12-16 servings 1x
- Category: Dessert
- Method: Baking
- Cuisine: American
- Diet: Vegetarian
Ingredients
- 1 cup unsalted butter
- 2 cups granulated sugar
- 4 large eggs
- 1 teaspoon vanilla extract
- 1 cup all-purpose flour
- 1 cup cocoa powder
- 1/2 teaspoon salt
- 1/2 teaspoon baking powder
- Chocolate cookies (for gravestones)
- Green frosting (for grass)
- Gummy worms (for decoration)
- Edible eyes (for decoration)
Instructions
- Preheat the oven to 350°F (175°C) and grease a 9×13 inch baking pan.
- In a large bowl, melt the butter and mix in the sugar until well combined.
- Add the eggs one at a time, mixing well after each addition, then stir in the vanilla extract.
- In another bowl, whisk together the flour, cocoa powder, salt, and baking powder.
- Gradually add the dry ingredients to the wet ingredients, mixing until just combined.
- Pour the brownie batter into the prepared baking pan and spread evenly.
- Bake for 25-30 minutes or until a toothpick inserted in the center comes out clean.
- Let the brownies cool completely before decorating.
- Once cooled, use the green frosting to create grass and place chocolate cookies as gravestones.
- Add gummy worms and edible eyes for a spooky effect.
Notes
- For a richer flavor, consider adding chocolate chips to the batter.
- These brownies can be made a day in advance and stored in an airtight container.
- Feel free to customize decorations based on your Halloween theme.
Nutrition
- Serving Size: 1 brownie
- Calories: 250
- Sugar: 20g
- Sodium: 150mg
- Fat: 12g
- Saturated Fat: 7g
- Unsaturated Fat: 3g
- Trans Fat: 0g
- Carbohydrates: 35g
- Fiber: 2g
- Protein: 3g
- Cholesterol: 50mg