
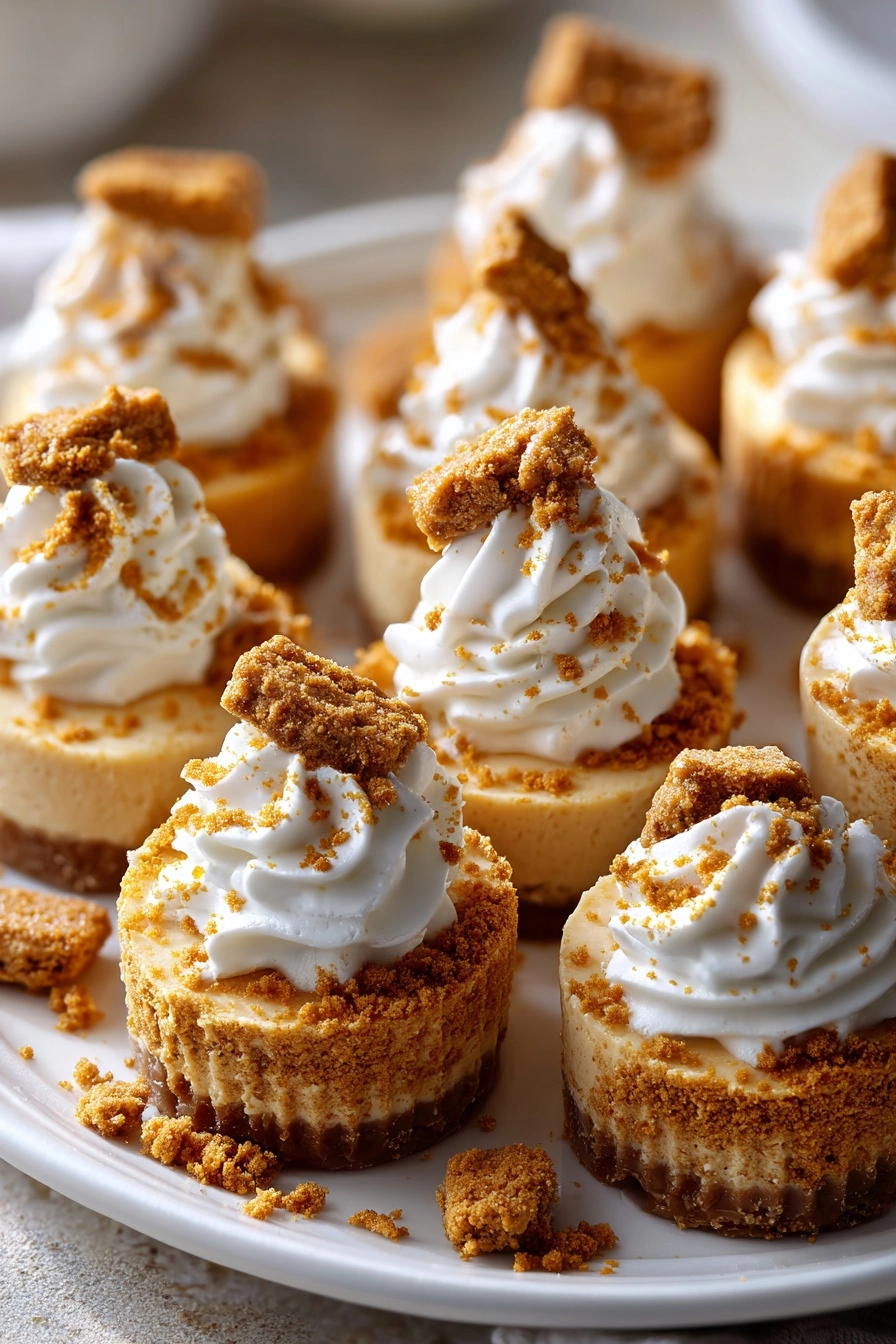
Introduction to No-Bake Mini Biscoff Cheesecakes
Hey there, fellow dessert lovers! If you’re anything like me, you know that life can get pretty hectic. Between juggling work, family, and everything in between, finding time to whip up a delicious treat can feel impossible. That’s where these No-Bake Mini Biscoff Cheesecakes come to the rescue! They’re not just easy to make; they’re a delightful way to impress your loved ones without spending hours in the kitchen. With a creamy filling and a crunchy Biscoff cookie crust, these mini cheesecakes are the perfect sweet escape for any busy day.
Why You’ll Love This No-Bake Mini Biscoff Cheesecakes
These No-Bake Mini Biscoff Cheesecakes are a dream come true for busy moms and professionals alike. They come together in just 20 minutes, leaving you with more time to enjoy life. The rich, creamy filling paired with the crunchy Biscoff crust creates a flavor explosion that’s simply irresistible. Plus, they’re perfect for any occasion, whether it’s a family gathering or a cozy night in. Who wouldn’t love that?
Ingredients for No-Bake Mini Biscoff Cheesecakes
Let’s gather our ingredients for these delightful No-Bake Mini Biscoff Cheesecakes. Each component plays a crucial role in creating that perfect balance of flavors and textures. Here’s what you’ll need:
- Biscoff cookies: These are the star of the show! Their caramelized flavor and crunchy texture make for a fantastic crust.
- Unsalted butter: This helps bind the crushed cookies together, giving the crust a rich, buttery taste.
- Cream cheese: The base of our filling, it adds creaminess and a slight tang that balances the sweetness.
- Powdered sugar: This sweetens the filling without adding graininess, ensuring a smooth texture.
- Vanilla extract: A splash of this adds warmth and depth to the flavor profile.
- Heavy whipping cream: Whipped to perfection, it lightens the filling and gives it that airy texture we all love.
- Biscoff spread: This is the cherry on top! A dollop of this creamy goodness elevates the cheesecakes to a whole new level.
For those looking to mix things up, consider using gluten-free cookies for a gluten-free version or adding a pinch of cinnamon to the crust for a warm spice kick. You can find all the exact measurements at the bottom of the article, ready for printing!
How to Make No-Bake Mini Biscoff Cheesecakes
Now that we have our ingredients ready, let’s dive into the fun part: making these No-Bake Mini Biscoff Cheesecakes! Follow these simple steps, and you’ll have a delightful dessert that’s sure to impress.
Step 1: Prepare the Crust
Start by crushing the Biscoff cookies into fine crumbs. You can use a food processor or simply place them in a zip-top bag and crush them with a rolling pin.
Mix the crushed cookies with melted unsalted butter in a bowl until well combined.
This mixture should resemble wet sand.
Now, press it firmly into the bottom of your mini cheesecake cups.
Make sure it’s even and compact; this will give you a sturdy base for your cheesecakes.
Step 2: Make the Cream Cheese Filling
In a separate bowl, beat the softened cream cheese until it’s smooth and creamy.
Add the powdered sugar and vanilla extract, mixing until everything is well blended.
This is where the magic begins!
The cream cheese should be at room temperature for easy mixing.
If you want a stronger Biscoff flavor, feel free to add a bit more Biscoff spread to the filling.
Step 3: Whip the Cream
In another bowl, whip the heavy cream until stiff peaks form.
This means when you lift the whisk, the cream should hold its shape.
Be careful not to over-whip, or it might turn into butter!
Gently fold the whipped cream into the cream cheese mixture.
This step is crucial for achieving that light, airy texture we all love in a cheesecake.
Step 4: Combine and Fill
Once the whipped cream is fully incorporated, it’s time to fill those mini cheesecake cups.
Spoon the creamy filling into each cup, making sure to leave a little space at the top for the Biscoff spread.
You can use a piping bag for a neat finish, or just a spoon will do.
The filling should be smooth and luscious, just like a cloud of happiness!
Step 5: Chill and Set
Now comes the hardest part—waiting!
Place the filled cheesecake cups in the refrigerator and let them chill for at least 4 hours, or until set.
This step is essential for the flavors to meld together and for the filling to firm up.
If you can, make them a day in advance.
They’ll taste even better after a night in the fridge!
Step 6: Add the Topping
Before serving, it’s time to add that irresistible touch.
Spoon a dollop of Biscoff spread on top of each mini cheesecake.
You can even swirl it around for a beautiful presentation.
This final touch not only looks gorgeous but adds an extra layer of flavor that’s simply divine.
Now, sit back and enjoy the compliments!
Tips for Success
- Make sure your cream cheese is at room temperature for easy mixing.
- Don’t rush the chilling process; it’s key for the perfect texture.
- Use a piping bag for a neat filling if you want to impress.
- For a fun twist, try adding crushed Biscoff cookies on top as a garnish.
- Feel free to experiment with flavors by adding a hint of cinnamon or nutmeg!
Equipment Needed
- Mixing bowls: A set of various sizes will do. You can also use a large pot if needed.
- Whisk or electric mixer: Either works for beating the cream cheese and whipping the cream.
- Mini cheesecake cups: Use silicone molds or muffin tins lined with paper cups.
- Spatula: A rubber spatula is perfect for folding and scraping.
Variations
- Gluten-Free: Swap out Biscoff cookies for gluten-free cookies to make this dessert suitable for gluten-sensitive friends.
- Chocolate Lovers: Add cocoa powder to the cream cheese filling for a chocolatey twist that pairs beautifully with the Biscoff flavor.
- Fruit Topping: Top with fresh berries or a fruit compote for a refreshing contrast to the rich cheesecake.
- Nutty Crunch: Mix in crushed nuts like pecans or almonds into the crust for added texture and flavor.
- Vegan Option: Use vegan cream cheese and coconut cream in place of heavy whipping cream for a plant-based version.
Serving Suggestions
- Pair with Coffee: These mini cheesecakes are delightful with a cup of freshly brewed coffee or espresso.
- Garnish with Fresh Fruit: Add a few berries on the side for a pop of color and freshness.
- Elegant Presentation: Serve on a beautiful platter, drizzled with extra Biscoff spread for a stunning look.
- Chill Before Serving: Keep them in the fridge until just before serving for the best texture.
FAQs about No-Bake Mini Biscoff Cheesecakes
Can I make these No-Bake Mini Biscoff Cheesecakes in advance?
Absolutely! In fact, making them a day ahead enhances the flavors. Just keep them covered in the fridge until you’re ready to serve.
How long do these cheesecakes last in the fridge?
These delightful treats can last up to 5 days in the refrigerator. Just make sure they’re stored in an airtight container to maintain freshness.
Can I use a different type of cookie for the crust?
Of course! While Biscoff cookies are fantastic, you can substitute them with graham crackers or Oreos for a different flavor profile.
What if I don’t have heavy whipping cream?
If you’re out of heavy whipping cream, you can use whipped topping as a substitute. Just keep in mind that it may alter the texture slightly.
Is there a way to make these cheesecakes lower in sugar?
Yes! You can reduce the amount of powdered sugar in the filling or use a sugar substitute to make these No-Bake Mini Biscoff Cheesecakes a bit healthier without sacrificing taste.
Final Thoughts
Creating these No-Bake Mini Biscoff Cheesecakes is more than just making a dessert; it’s about crafting moments of joy. Each bite is a delightful reminder that even in our busy lives, we can indulge in something sweet and satisfying. Whether you’re sharing them with family or enjoying a quiet moment to yourself, these mini cheesecakes bring a smile to your face. Plus, the ease of preparation means you can whip them up anytime the craving strikes. So, gather your ingredients and let the magic happen—your taste buds will thank you!
PrintNo-Bake Mini Biscoff Cheesecakes You Can’t Resist!
Delicious and easy-to-make no-bake mini cheesecakes with a Biscoff cookie crust and creamy filling.
- Prep Time: 20 minutes
- Cook Time: 0 minutes
- Total Time: 4 hours 20 minutes
- Yield: 12 mini cheesecakes 1x
- Category: Dessert
- Method: No-Bake
- Cuisine: American
- Diet: Vegetarian
Ingredients
- 1 cup Biscoff cookies, crushed
- 4 tablespoons unsalted butter, melted
- 8 oz cream cheese, softened
- 1/2 cup powdered sugar
- 1 teaspoon vanilla extract
- 1 cup heavy whipping cream
- Biscoff spread for topping
Instructions
- In a bowl, combine crushed Biscoff cookies and melted butter until well mixed.
- Press the mixture into the bottom of mini cheesecake cups to form the crust.
- In another bowl, beat the softened cream cheese, powdered sugar, and vanilla extract until smooth.
- In a separate bowl, whip the heavy cream until stiff peaks form.
- Gently fold the whipped cream into the cream cheese mixture until combined.
- Fill the mini cheesecake cups with the cream cheese mixture.
- Chill in the refrigerator for at least 4 hours or until set.
- Before serving, top with a dollop of Biscoff spread.
Notes
- Make sure the cream cheese is at room temperature for easier mixing.
- For a stronger Biscoff flavor, add more Biscoff spread to the filling.
- These cheesecakes can be made a day in advance.
Nutrition
- Serving Size: 1 mini cheesecake
- Calories: 250
- Sugar: 15g
- Sodium: 150mg
- Fat: 18g
- Saturated Fat: 10g
- Unsaturated Fat: 5g
- Trans Fat: 0g
- Carbohydrates: 20g
- Fiber: 1g
- Protein: 3g
- Cholesterol: 40mg